Welcome to Rondelek
Hello, and welcome. Rondelek TWST-1 is a little arcade of sounds for kids. A child records a funny noise onto a big colourful key, taps it, and hears it come right back. Then they switch to a game and steer it with nothing but their voice: say “aaa” and the hero jumps. It’s a toy first, and a sneaky bit of practice with sounds and vowels along the way.
One install serves the whole family. Every child gets their own card, picture and recordings, and everything stays in plain folders on your computer. No accounts, no internet, no ads.
Two ways into this book
If you’re a parent or a grown-up helping a child play, start with Playing with Rondelek. It walks you from downloading the app to your child’s first game, with one important stop on the way: the voice calibration. It only takes a minute or two, and it’s what lets the games understand your child.
If you’d like to see how it’s made, head to Under the hood. It starts with building the app yourself, then shows you around the code: how sound flows from the microphone to the speakers, how the screens are drawn, how the app recognises vowels, and how the games are put together.
Under the hood, at a glance
- Language: Rust (edition 2024), in a workspace of three crates:
core(shared logic, no GUI),app(the sound board and menus) andgame(the voice games, which run as a separate process). - App GUI:
egui/eframe, immediate-mode. - Games:
raylib, in its own window and process. - Audio:
cpalfor recording and playback,houndfor WAV files,rustfftfor the dancing spectrum, andspectrogramsfor the MFCC vowel detector. - Camera:
nokhwa, for taking a picture for a child’s card. - Storage: plain JSON files (
serde) in the usual OS data and config folders. No database, no network.
| Chapter | What you’ll find there |
|---|---|
| Building from source | Getting the code running on Windows, macOS or Linux, the everyday commands, and handy test switches. |
| Architecture | The App struct, the per-frame loop, the screen state machine, threading. |
| Audio routing | The essential one. Recording, playback, the visualizer taps, device management. |
| The visualizer | The pluggable Visualizer trait, the spectrum pipeline, vowel detection and calibration. |
| UI, layout & rendering | The fluid layout, the renderer, theming, fonts, translations. |
| Data model & storage | What lives on disk, and how it’s laid out. |
| Voice games | The game process, Vowel Runner’s scene, the art, the shaders, and adding a game. |
| Libraries | Every dependency, and why it’s here. |
Keeping this book current: these pages are treated as part of the code. Any change to how the app behaves or is wired updates the matching page in the same commit. Contributing to these docs has the details.
Getting started
Let’s get Rondelek onto your computer and make a card for your child. It takes about five minutes, and there’s nothing to sign up for.
Downloading it
Ready-made downloads live on the latest release page, under Assets.
Windows
- Download the
.zip(it ends in…-windows-msvc.zip). - Unzip it anywhere you like. Documents is fine.
- Double-click
rondelek.exe.
Please keep rondelek.exe and rondelek-game.exe together in the same
folder. The app starts the games from right next to itself, so if they get
separated, the games can’t be found.
The very first time, Windows may say “Windows protected your PC”. That’s because the app isn’t code-signed (a signing certificate costs money every year), not because anything is wrong. Click More info, then Run anyway, and Windows won’t ask again.
Linux
- Download
rondelek-…-x86_64.AppImage. It’s one file with nothing to install. - Let it run as a program: right-click it, choose Properties, and tick
Allow executing as a program. (Or, in a terminal:
chmod +x rondelek-*.AppImage.) - Double-click it.
It runs on Ubuntu 22.04 or newer, Debian 12 or newer, Fedora, Arch and other current distributions. A few extras, if you want them:
- To start the games on their own, run the AppImage with
--game. - For a menu entry and one-click updates, open the AppImage with Gear Lever.
- There’s also a plain
.tar.gzof the same two programs on the release page.
macOS
There’s no ready-made download for the Mac yet. It builds nicely from source, though, and Building from source walks you through it.
The first time you open it
Rondelek opens on Who’s playing?, with a row of cards, one for each child. On the very first day there’s just one card: New child.
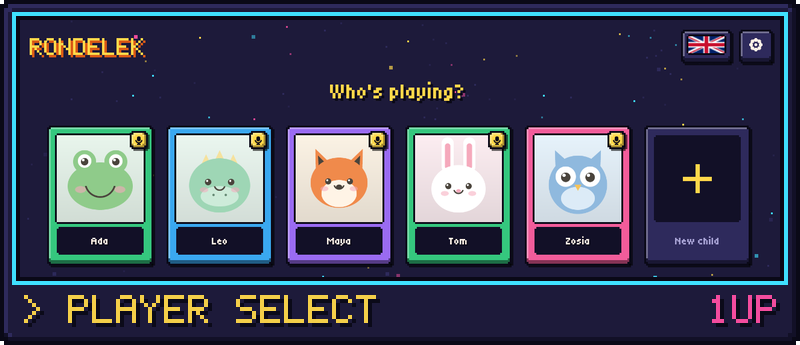
The app picks your computer’s language on its own. If you’d like a different one, the little flag in the top corner opens the language list. There are seven so far: English, Polski, Deutsch, Français, Español, Italiano and Українська.
Making a card for your child
Press New child, type their name, and choose a picture. There are three kinds:
- A cartoon friend. A fox, a frog, an owl, and more, drawn either as bright pixel art or in a softer, classic style. Kids usually love picking one.
- A photo from the webcam. Press Take photo, smile, and capture.
- Any picture you have. Press Upload picture and choose a file (PNG, JPEG or WebP).
Press Create, and your child’s card is ready. You can change the name or the picture any time later, from the little pencil key next to their name.
What’s next
Tap the card, and your child arrives at their own screen with three big tiles: Sounds, Games and Voice calibration.
Before the games, please do the voice calibration together. It’s the one step that really matters, and it only takes a minute or two. Voice calibration shows you how.
Voice calibration
If you do just one grown-up thing in Rondelek, make it this one. It takes a minute or two, and it’s what lets the games and the vowel screen understand your child.
Why it matters
Every child’s voice is a little different. A four-year-old’s “aaa” sounds nothing like a ten-year-old’s, and a laptop’s built-in microphone hears things differently from a headset. So Rondelek doesn’t guess from a textbook. Instead, it listens to your child saying the six vowels, remembers what each one sounds like, and from then on recognises your child against their own voice.
That’s why calibration isn’t optional. Without it, the games and the vowel screen have nothing to compare against, so they simply stay quiet. (The sound board works either way.) Until it’s done, the child’s Voice calibration tile says Start here!, and the Games screen offers a shortcut to it.
Doing it together
- On your child’s screen, tap the yellow Voice calibration tile.
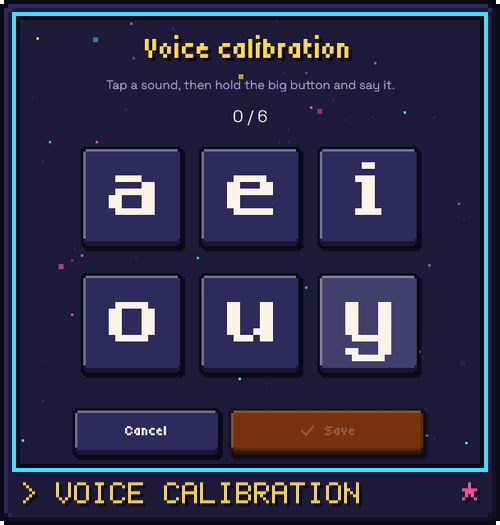
- You’ll see six big keys: a e i o u y. Tap the first one.
- Hold the big orange Hold to record button (or the
Spacebar) and let your child say the sound and keep it going, like a little song: “aaaaaa”. Let go when they stop. A second or two is plenty. - Press Next sound and do the same for the next vowel. (After the last one, the button says All sounds done and takes you back.)
- When all six keys have turned green with a tick, press Save. That’s it.
While you’re recording, a small level bar shows how loud the sound is arriving. If the app hears noise but not a clear vowel, it gently asks the child to keep the sound going.
Tips for a great calibration
- Make it a game. “Can you sing aaa like an opera singer?” “Make an ooo like an owl!” Children who are having fun give the clearest sounds.
- Two or three takes per vowel help a lot. Just hold the button again on the same vowel: once a bit higher, once a bit lower, once a bit louder. The key shows how many takes it has (×2, ×3). Recognition gets noticeably steadier with a little variety.
- Use the microphone your child will play with, at about the same distance, in a quiet-ish room. The same microphone matters more than a fancy one.
- Watch the level bar. It should move nicely but not turn red. Too quiet means move closer, and too loud means back off a little.
- Did one go wrong? Tap that vowel and press Start over to record it again. The others stay as they are.
When to calibrate again
Calibrating again means recording all six vowels afresh. It’s just as quick as the first time, so don’t hesitate:
- You switched microphones, or moved to a very different room. The For grown-ups page even notices when the microphone has changed since the last calibration, and tells you.
- The games seem confused, mixing up two vowels or not reacting.
- Your child’s voice has changed. Children grow, and their vowels get clearer with practice. A fresh calibration now and then keeps up with them.
You can start it from the child’s Voice calibration tile, or from the For grown-ups page (Calibrate the voice, on the Profile card).
Still a little picky?
If recognition feels too eager or too fussy even after a good calibration, the For grown-ups page has a Voice recognition card with three settings: Relaxed, Normal and Strict. The grown-ups page explains them.
Curious how the app actually tells an a from an o? The next page, How it works, in plain words, explains the idea without any code.
How it works, in plain words
Ever wondered how the app tells an a from an o? This page explains the idea behind voice calibration without any code, so anyone can follow along. If you’d like the implementation, it’s in The visualizer → Calibration.
What a vowel is, to the app
Every vowel has its own sound shape: the pattern of which pitches are loud and which are quiet while you hold the sound. “ee” and “oo” feel different in your mouth because that pattern is different, and a microphone can hear the difference too. The app boils each pattern down to a compact fingerprint.
So “recognising a vowel” simply means asking: which stored fingerprint does the voice match right now?
For the technically curious: the fingerprint is a vector of MFCCs (mel-frequency cepstral coefficients), the standard, sturdy way to describe the shape of a speech sound. The app deliberately doesn’t track formants (F1/F2). Estimating formants from a child’s high, bright voice is famously unreliable (LPC reports false formants at high pitch), and it was the cause of an earlier version’s wobbles. Comparing whole shapes sidesteps the problem.
The problem calibration solves
Every voice is different, and so is every microphone and every room. The app can’t know in advance what this child’s a sounds like on this laptop. So instead of guessing, it learns the child’s six vowels directly, and then recognises the child against their own recordings.
The app has exactly one job here: recognise what the child said, compared with their own calibration. It doesn’t grade or correct anyone. As a child’s vowels grow clearer over time, you simply calibrate again, and the app’s idea of “their a” grows along with them.
What calibration actually does
The app asks for all six vowels (a e i o u y), one at a time, each held for a moment. For every vowel it collects a handful of fingerprints and keeps their average as that vowel’s template. From then on, it compares the live voice with those six templates and lights up the closest one. It only does that when there’s a clear winner, so a half-formed sound shows as “no vowel” instead of a flickering guess.
Think of a tailor. A tailor takes your measurements so the clothes fit you, instead of assuming everyone’s the same size. As the child grows, you take the measurements again.
Why the microphone cancels out (and why there’s no sweep)
A cheap microphone colours the sound: it boosts some pitches and dips others. You might expect that to spoil recognition, but it doesn’t, because the child is always compared with their own templates, recorded on the same microphone. The microphone colours the templates and the live voice in the same way, so the colouring cancels out when they’re compared. (The app also removes a running estimate of the microphone’s colouring from every moment of sound, a trick called cepstral mean normalisation, which takes care of most of what’s left, even after a microphone change.)
That’s why there’s no microphone sweep test to sit through: it would add a lot of machinery to flatten something that already cancels out.
What does matter is the level. Sound that’s too loud (clipping) or too quiet (lost in noise) has a smudged shape. That’s why calibration, and the Sound card on the grown-ups page, show a live level meter that warns about too quiet and too loud. Keep an eye on it while you record.
For the technically curious: matching is a nearest-template classifier over the MFCC vectors (diagonal-covariance, Mahalanobis distance), with a confidence and a margin gate, so a recognition is a firm decision. Templates are stored with the microphone’s channel mean removed, and the live detector keeps its own running channel mean.
A few words about microphones
- A steady, decent microphone at a steady distance works best. Consistency matters more than quality.
- If you change microphones (or move to a very different room), calibrate again. The app remembers which microphone was used, and the Profile card on the For grown-ups page tells you when the current one is different.
- Calibrate again whenever the child’s vowels have clearly changed. That’s how the app keeps up with them.
What changed from earlier versions
Earlier builds tried to measure formants, and offered two modes (“Practice” and “Play”) with different targets. Both are gone: formants are unreliable for children’s voices, and the toy now has one simple, honest job, which is recognising the child against their own calibration. This page and the code both follow that single MFCC-template path.
The sound board
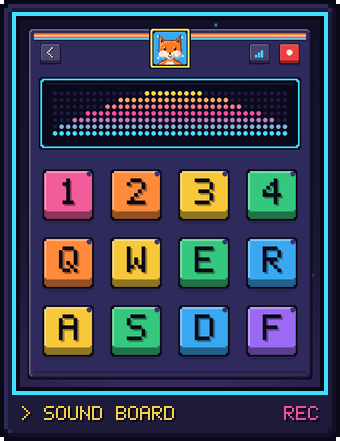
The sound board is Rondelek’s first way to play, and the one that works right away, even before the voice calibration. Twelve big keys, and every one can hold a sound: a giggle, a growl, a sung “la-la-la”, a dog’s bark, a grandparent saying hello. Record it, tap it, and there it is again.
Open it with the Sounds tile on your child’s screen.
Recording a sound
- Press the red REC key at the top right (or the
Spacebar). The board switches to recording mode. - Hold a key and make the sound. It records for as long as you hold it.
- Let go (or press
Esc) to stop.
A little light in the key’s corner shows that it now holds a sound. Recording onto a key that already has one simply replaces it.
Playing the sounds
Press REC (or Space) again to get back to playing, then tap any key
to hear its sound. Tap as often as you like, and try several keys quickly:
the sounds play on top of each other, so a child can make their own little
song out of them.
Each key has a letter on it, matching the keyboard: 1 2 3 4 on the top row, Q W E R in the middle and A S D F at the bottom. So the sound board works with the mouse or the keyboard, whichever your child likes best.
The little screen
Above the keys is a small glowing screen. The square key just left of REC changes what it shows:
- Sound bars: little bars that dance along with every sound, whether it’s your child’s voice or a key playing back.
- Vowels: a big letter showing which vowel the app hears, with a meter for each of the six. This one needs the voice calibration, and it’s a lovely way to check that the calibration worked.
- Off: a calm, dark screen.
Everything is kept
You never need to save. Every recording is kept straight away, and the next time your child opens Sounds, their board is exactly as they left it.
Each set of twelve recordings is called a session. Now and then it’s nice to start fresh, say on a new day or for a new game idea. On your child’s screen, Start with empty pads begins a new, empty session. The old one isn’t gone: grown-ups can open any earlier session again from the grown-ups page.
To leave the sound board, press the back key at the top left.
The games
The games are Rondelek’s second way to play, and here the child’s voice is the controller. No buttons, no joystick: just say a vowel, and something happens on screen.
The games need the voice calibration, so they know what your child’s vowels sound like. If it isn’t done yet, the Games screen shows a friendly reminder with a key that takes you straight there.
Vowel Runner
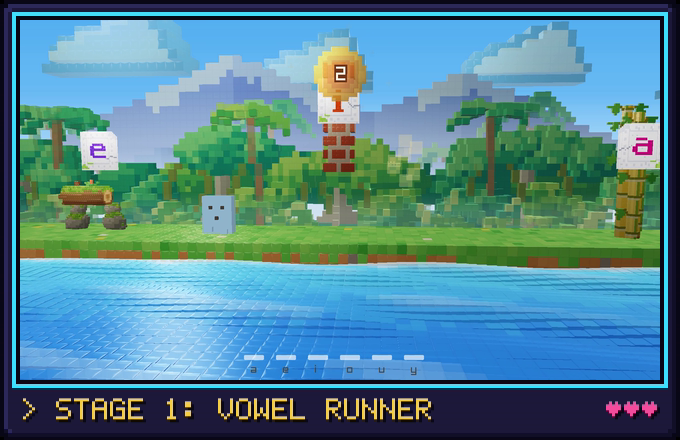
The first game is Vowel Runner. A little blocky hero runs along a meadow by the sea, in front of a thick jungle of trees, big leaves and palms swaying in the wind (glassy at the front, where the sun twinkles now and then) under tall snowy mountains, and things come their way: logs and sleeping tortoises to jump over, fallen trees to duck under, brick walls to knock down with a star, and tall bamboo that needs a double jump. Your child says one vowel to jump (say it again in mid-air for a flying double jump), another to duck, and a third to throw a star.
Every obstacle comes with a little white stone tablet, like a relic from an old jungle temple, the vowel that gets past it carved right in. The tablets listen too: when your child says a tablet’s vowel, it gives a happy hop, and its letter lights up for as long as the sound goes on.
A miss is no drama: the hero just bounces off and keeps running. Every obstacle cleared the way it asks earns a point, and the golden sun at the top spins round like a coin to show the new score. (Leaping over a bar or a wall gets past it, but only ducking under the tree or knocking the wall down with a star counts, so every vowel gets its turn.)
Now and then grassy ledges float by with little golden suns over them. Jump up onto a ledge (right through it from below is fine) and run along it to collect the suns: each one is a point too. The high ledges need the double jump, or a hop up from a low ledge just before them.
When a sound comes out, the sea along the front gets playful too: its waves dance while the child makes noise. The scenery itself stays calm and slow on purpose, so nothing competes with the hero or makes anyone dizzy.
Before each game: the grown-up’s screen
Every game starts on a small setup screen. It has no words at all, just pictures, so it works in any language:
- Which vowel does what. For each move (▲ jump, ▼ duck, ★ throw a star), pick a vowel. Choose sounds your child can say comfortably, or sounds you’d like to practise.
- Which obstacles appear. Switch obstacle kinds on or off. Fewer kinds make an easier, gentler game.
- Reaction (the turtle and the rabbit). Towards the turtle, the game waits a moment to be sure it heard right, and makes fewer mistakes. Towards the rabbit, it reacts at once. The game remembers this for next time, and you’ll find the same setting on the grown-ups page.
Press ▶ to play.
A nice detail: the game then listens only for the vowels you picked. So if, say, e and y sound alike for your child, and you only picked e, the game won’t get confused by a y.
While playing
- Press
Escto end the game. You’re taken straight back to the app. - The keys
A E I O U Yact like saying that vowel. They’re handy for a grown-up trying the game out, or for checking which vowel does what.
While a game is running, Rondelek itself steps quietly aside and hands the microphone over to the game, so nothing gets in the way.
Starting a game on its own
The games also run without the main app. On Windows, double-click
rondelek-game.exe. On Linux, run the AppImage with --game (the menu
entry has a Voice games shortcut, too). The game first asks
who’s playing, showing the same children and pictures as the app, and then
off you go.
More games are coming
Vowel Runner is the first of several. New games plug into the same setup: the same children, the same calibration, the same who’s-playing screen. If you build things, Voice games under the hood shows how a game is made.
The grown-ups page
Everything a grown-up might want to adjust lives on one page, called
For grown-ups. It’s a single scrolling page, with no pop-up windows and no
hidden menus. Open it with the ⚙ key at the top right of the start screen or of
a child’s screen, or press F12 anywhere. The back key takes you back to where
you were.
Changes are saved straight away. Each card also tells you whether it affects only this profile (the child you came from) or everyone on this computer.
Profile
Only shown when you opened the page from a child’s screen.
- Change name or picture, just like when you made the card.
- Voice calibration: whether it’s done and when. If a different microphone is in use now than at the last calibration, you’ll see a note here, and Calibrate the voice starts a fresh one. See Voice calibration.
- Delete this profile… removes the child’s card, pictures and recordings
from the app. To make sure it’s on purpose, you type the child’s name first.
Nothing is erased for good, though: the folder moves into a
.trashfolder inside the library, so it can still be rescued by hand.
Sessions
Also only for the current child.
Each set of twelve sound-board recordings is a session. Here you’ll find all of this child’s sessions, newest first. Each one shows its date (“Today, 12:54”, “25 September, 13:54”) and how many keys hold a sound.
- The session the Sounds tile opens is marked in green, with a Continue key.
- Open any other session to carry on there. From then on, Sounds opens that one.
- New session with empty pads starts fresh (the others stay safe).
- The newest five are shown at first; Show all lists the rest.
Sound
- Speaker and Microphone: Auto follows your computer’s own choice, or you can pin a specific device. If a pinned device goes missing, Rondelek falls back to the default and tells you.
- Volume, with Play a test sound for a quick check.
- Microphone level: speak normally, and the bar should move but not turn red.
Voice recognition
How sure the app must be before it shows a vowel or moves something in a game.
- Relaxed reacts more easily, which is good for quiet or shy voices.
- Normal is the everyday choice.
- Strict waits for a clearer sound and mixes up fewer vowels.
Show advanced settings reveals the individual knobs, for the curious. If you change them, the card simply says you’re on custom values.
Sampler screen
What the little screen above the sound-board keys shows: Sound bars, Vowels or Off. (The square key next to REC on the sound board switches it too.) The advanced settings fine-tune the sound bars.
Games
How quickly the games react to the voice, from Steadier (waits a moment, fewer mistakes) to Snappier (reacts at once). It’s the same setting as the turtle-and-rabbit slider on a game’s setup screen.
Look & language
- Language: tap a flag. There are seven: English, Polski, Deutsch, Français, Español, Italiano and Українська.
- Sampler skin: the look of the sound board. Arcade is the default, Classic is the softer original, and any skins you add appear here too. Open skins folder shows where to put them. (Want to design one? The skins guide explains how.)
About & data
The version number, and Open data folder, which opens the folder holding all the children, recordings and settings. They’re ordinary files, and nothing is ever sent anywhere.
In case you’d like to know where that folder is:
| System | Children and recordings | Settings |
|---|---|---|
| Windows | %APPDATA%\rondelek\profiles | %APPDATA%\rondelek\settings.json |
| macOS | ~/Library/Application Support/rondelek/profiles | ~/Library/Application Support/rondelek/settings.json |
| Linux | ~/.local/share/rondelek/profiles | ~/.config/rondelek/settings.json |
Backing up is as simple as copying those rondelek folders somewhere safe.
Keys and shortcuts
Everything in Rondelek works with the mouse. These keys are there for anyone who likes the keyboard better.
On the sound board
| Key | What it does |
|---|---|
1 2 3 4 / Q W E R / A S D F | the twelve keys, row by row |
Space | switch between recording and playing (the REC key) |
| (recording) hold a key | record while it’s held; let go or press Esc to stop |
| (playing) tap a key | play its sound |
The square key just left of REC changes the little screen: sound bars, vowels, or off.
During voice calibration
| Key | What it does |
|---|---|
hold Space | record the vowel on screen, just like holding the big button |
In the games
| Key | What it does |
|---|---|
A E I O U Y | acts like saying that vowel (handy for trying a game out) |
Esc | end the game and go back to the app |
Anywhere
| Key | What it does |
|---|---|
F12 | open or close the For grown-ups page |
Ctrl+Shift+S | save a screenshot (on the sound board, into that session’s folder) |
Building from source
Welcome to the workshop. This page gets Rondelek running from its source code, on Windows, macOS or Linux, even if you’ve never touched Rust before. Then it shows you the everyday commands, and a few handy switches for testing.
1. Install Rust
Rust is installed with rustup, the official toolchain manager. Grab it from
rustup.rs. On macOS and Linux it’s one command:
curl --proto '=https' --tlsv1.2 -sSf https://sh.rustup.rs | sh
Then restart your terminal and check that it worked:
rustc --version # should print 1.88 or newer (edition 2024 + let-chains)
2. A few system bits
macOS needs nothing extra: audio (CoreAudio) and the camera (AVFoundation) are built in. The first time you use Take photo, macOS asks for camera permission. If you say no, the app just shows “Camera unavailable” and everything else keeps working. (You can change your mind later under System Settings → Privacy & Security → Camera.)
Linux needs a few development packages for audio, file dialogs, the window and the webcam. On Debian or Ubuntu:
sudo apt install build-essential pkg-config cmake clang \
  libasound2-dev libgtk-3-dev libudev-dev libv4l-dev \
  libx11-dev libxcb1-dev libxrandr-dev libxinerama-dev libxcursor-dev \
  libxi-dev libgl1-mesa-dev
cmake, clang and the X11/GL headers are for raylib, which the game binary
compiles from source. Package names differ a little between distributions. If
a build fails, the error message usually names the missing library.
Windows needs the MSVC C++ Build Tools (the Desktop development with
C++ workload in the Visual Studio Installer). After that, rustup and
cargo work just as described here. Audio and the camera use the built-in
Windows APIs.
3. Get the code and run it
git clone https://github.com/pipejesus/rondelek-twst-1.git rondelek
cd rondelek
cargo run --release
The first build compiles every dependency and takes a few minutes. That’s normal, and it’s cached afterwards. The app opens on Who’s playing?.
Please use
--release, especially for the webcamPlain
cargo runmakes a debug build: quick to compile, but the image and audio code runs unoptimised. The webcam preview shows it most, because decoding and scaling each frame is real work:
Build Per frame Live preview cargo run(debug)~1300 ms ~1 fps (a slideshow) cargo run --release~38 ms ~26 fps (smooth) That’s about 34 times faster. If the camera feels like a slideshow, you’re almost certainly on a debug build.
Building the programs to share
To make optimised programs you can copy anywhere:
cargo build --release
You’ll find two programs in target/release/: the app, rondelek, and
the game runner, rondelek-game (with .exe on Windows). Fonts,
translations, flags, the built-in skins, shaders and 3D models are all baked
in. The app starts games by running rondelek-game from its own folder, though,
so always keep and copy the two together.
Under plain cargo run, pressing a game first builds rondelek-game (with the
same profile) and then launches it, so you never play a stale game by
accident. The ready-made downloads are built by CI; Releases & packaging
tells that story.
Everyday commands
cargo run --release          # build and run (games are rebuilt on launch)
cargo test                   # run the test suite
cargo fmt --all              # tidy the formatting
cargo clippy --all-targets   # catch common mistakes
Branches. develop is the main branch. Work on a branch off it and open
a pull request against develop; the workflow is in AGENTS.md.
Git hooks (optional, but they save round trips). pre-commit checks the
formatting, and pre-push runs clippy and the tests, the same checks as CI.
Turn them on once per clone:
git config core.hooksPath .githooks
Translations stay in sync. assets/i18n/en.json is the source of truth,
and every other language file (pl, de, fr, es, it, uk) must carry the same
keys. cargo test fails if they drift. AGENTS.md has the full rule.
Handy switches for testing
These environment variables jump straight to a screen, and can grab a screenshot on the way. They’re great for testing, demos and pictures:
| Variable | What it does |
|---|---|
RONDELEK_LANG=de | start in a specific language |
RONDELEK_SIZE=640x760 | set the starting window size |
RONDELEK_PROFILE=<dir> | open that child’s screen |
RONDELEK_SESSION=<dir> | jump straight into a session (the sound board) |
RONDELEK_SCREEN=newprofile | editprofile | calibrate | games | settings | open that screen (editprofile, calibrate and games need RONDELEK_PROFILE) |
RONDELEK_CALIB_VOWEL=<n> | with calibrate: open vowel n’s record screen |
RONDELEK_VIZ=<n> | pick visualizer n (0 sound bars, 1 vowels, 2 off) |
RONDELEK_SHOT=<file.png> | draw a few frames, save a screenshot, and quit |
RONDELEK_GAME_SCREEN=profiles | select | (game) open the who’s-playing picker or the setup screen |
RONDELEK_GAME_FRAMES=<n> / RONDELEK_GAME_SHOT=<png> | (game) quit after n frames / save a screenshot |
RONDELEK_GAME_AUTOPLAY=1 | (game) demo mode: the game plays itself (for recording the README’s GIF) |
RONDELEK_GAME_SEED=<n> | (game) the same course every run (for comparing frames) |
RONDELEK_GAME_STATS=1 | (game) print the load time and where each frame’s time went, on exit |
RONDELEK_GAME_FPS=<n> | (game) cap the frame rate at n instead of pacing by the panel (0 lifts the cap, for timing) |
RONDELEK_GAME_RECORD=<dir> / RONDELEK_GAME_RECORD_FROM=<s> | (game) save every frame into the folder, the game stepping 1/30 s each however slowly it draws (smooth video from a slow display) / skip the first s seconds |
RONDELEK_LAMPULA / RONDELEK_WATER / RONDELEK_PROPS=<file.json> | (game) tuning files for the glass of the clouds and sun / the water / the meadow and obstacles; see Voice games |
RONDELEK_WIND=<file.json> | (game) tuning file for the wind in the jungle’s palms (WindParams); see Voice games |
For example, to capture the sound board and quit:
RONDELEK_SESSION="$HOME/Library/Application Support/rondelek/profiles/<id>/sessions/<ts>" \
RONDELEK_SHOT=out.png cargo run --release
Pictures without real children. The library and settings live under the OS
data and config folders, which on Linux follow XDG_DATA_HOME and
XDG_CONFIG_HOME. Point both at a temporary folder and add a few made-up
profiles, and you get clean screenshots without anyone’s real photos in them.
AGENTS.md shows the recipe.
If the fans spin up on Linux (Wayland)
winit’s Wayland backend can busy-wait between the compositor’s frame callbacks, which may keep one CPU core busy while the sound board animates. If your laptop’s fans start humming, run under XWayland instead, which waits properly for vsync:
cargo run --release -- --x11
Still screens idle at a slow, gentle repaint on either backend, so this mostly matters for the sound board and the voice calibration.
Architecture
Let’s start with the lay of the land. Rondelek is a Cargo workspace with three crates, each with its own job:
| Crate | Path | What it is |
|---|---|---|
rondelek-core | core/ | GUI-free shared library: audio I/O, vowel detection, settings, profiles, sessions, skin atlas geometry, game registry |
rondelek | app/ | the eframe/egui sampler app (plus the genskin / genarcadeskin / genarcade / genicon / genavatars / genpixelpals generator binaries) |
rondelek-game | game/ | the raylib voice games, run as a separate child process |
Why three and not one? On Windows, raylib and the app’s windowing stack
(eframe/winit) both define a ShowCursor symbol, and the two simply won’t link
into the same executable. So they live apart, and core sits in the middle,
shared by both. That’s also why core must never depend on egui, eframe or
raylib. Two checks guard the boundary; both must fail with “did not match any
packages”:
cargo tree -p rondelek -i raylib-sys
cargo tree -p rondelek-game -i eframe
The game does reach the windows crate, through cpal’s WASAPI backend. That
is safe while windows links per function (raw-dylib): if
cargo tree -i windows_x86_64_msvc ever finds something, the clash can return.
The app itself is a single-window eframe application with no global state.
Everything belongs to one App struct (app/src/app/mod.rs). There’s no async
runtime and no message bus, just a plain immediate-mode loop plus the audio
callback threads that cpal owns. Nice and easy to follow.
The per-frame loop
eframe calls App::ui() once for every frame it draws. Each time round, the app:
- Reaps a finished game child process (
game_child). - Picks a repaint policy (more on that below).
- Handles the global keys (F12 settings, Ctrl+Shift+S screenshot).
- Hands over to the current screen’s draw function.
Repaint policy. The app tries hard to sit quietly when there’s nothing to show:
- Animated screens (
Session,Calibrate,Settingsfor its live level meter, the camera, or the screenshot harness) run at about 30 fps (request_repaint_after(33 ms)). - Static screens get a gentle 100 ms heartbeat. Input events still wake egui straight away.
- While a game child is running, no repaint is requested at all. On Wayland, an occluded window gets no frame callbacks, so a pending repaint makes winit busy-wait on a whole core (winit #2690). When the game window closes, the compositor’s focus event wakes the app, which then reaps the child. (Should a compositor not refocus it, a timer-based reap is the fix; repainting while hidden is not.)
flowchart TD
    frame[eframe calls App::ui] --> reap[reap game child]
    reap --> keys[global hotkeys]
    keys --> screen{current screen}
    screen -->|Home| p[draw_home]
    screen -->|ProfileForm| f[draw_profile_form]
    screen -->|Hub| s[draw_hub]
    screen -->|Settings| st[draw_settings]
    screen -->|Calibrate| c[draw_calibrate + pump_calibration]
    screen -->|Games| gm[draw_games]
    screen -->|Session| g[draw_session]
    g --> audio[maintain_audio + drain_capture]
    audio --> render[draw skinned faceplate + visualizer + pads]
Screen state machine
Getting around the app is a small state machine, kept in App.screen
(AppScreen). Profiles and sessions are stored as folders on disk; you’ll find
the details in Data model.
stateDiagram-v2
    [*] --> Home
    Home --> ProfileForm: + New child
    Home --> Hub: pick a child
    ProfileForm --> Home: Cancel (create)
    ProfileForm --> Hub: Create / Save / Cancel (edit)
    Hub --> Session: Sounds (continue) / Start with empty pads
    Hub --> Games: Games
    Hub --> Calibrate: Voice calibration
    Hub --> ProfileForm: edit key
    Hub --> Home: Back
    Calibrate --> Hub: Save / Cancel
    Games --> Calibrate: calibration nudge
    Games --> Hub: Back
    Session --> Hub: Back (header key)
    Home --> Settings: gear / flag / F12
    Hub --> Settings: gear / F12
    Session --> Settings: F12
    Settings --> Home: Back (returns to caller)
    Settings --> Session: Open / Continue / New session
A few things worth knowing as you wander through:
- One form, two jobs. The profile form handles both “new” and “edit”, switched
by
FormMode. The avatar choice is anAvatarChoice(Keep/New(path)/Character(name)/Remove). - Settings is a screen (
AppScreen::Settings, the “For grown-ups” page).open_settingsremembers where you came from insettings_return, and it can scroll straight to a section (the Hub’s gear opens the Profile card).F12toggles it from anywhere. - Kids never browse sessions. On the Hub, Sounds simply carries on with
the session used last (
profile::most_recently_used: the latest of created, recorded into, or opened), or starts the first one. “Start with empty pads” makes a fresh one. Grown-ups get the full list on the settings page’s Sessions card and can open any of them.enter_sessionstamps the session it opens (Session::mark_opened), so Sounds carries on with that one next time. - Games are launched by
spawn_game, which runsrondelek-game <id> --profile <dir>from the same folder as the app’s own exe. The app drops itsCapturefirst so the game can have the microphone. Undercargo run(spotted via theCARGOandCARGO_MANIFEST_DIRenv vars),launch_gamefirst startscargo build -p rondelek-game, andpoll_game_buildspawns the game once that succeeds. Without that step,cargo runalone would leave you playing a stale game binary.
Threading model
There aren’t many threads, and each one keeps to its own lane:
flowchart TB
    subgraph UI[Main / UI thread]
      loop[eframe ui loop]
      loop --> drain[drain_capture: read both taps]
      loop --> draw[draw + visualizer.update/draw]
    end
    subgraph IN[cpal input thread]
      incb[input callback: fold to mono, push]
    end
    subgraph OUT[cpal output thread]
      outcb[output callback: mix sources, push monitor]
    end
    incb -. shared mic buffer .-> drain
    outcb -. shared monitor buffer .-> drain
    draw --> outcb
- The UI thread owns all the state and does all the drawing.
- The
cpalinput thread runs the microphone callback. It folds each frame to mono and pushes it into a shared buffer (Capture). - The
cpaloutput thread runs the speaker callback. It mixes the queued clips and pushes the mixed signal into a shared monitor buffer (Playback). - The camera (
nokhwa) is polled from the UI thread, and only while the webcam modal is open. - Games are a separate process, with their own raylib window and their own cpal input stream.
Each frame, the UI thread drains both shared buffers. The taps are
Arc<Mutex<VecDeque<f32>>>, and the locks are only held for a moment. Taking a
mutex on the real-time audio thread can glitch under contention; if audio ever
stutters, a lock-free SPSC ring buffer is the better design.
Module map
Here’s a quick map of where things live:
core/src/
  audio/         capture, playback, sample (WAV), device choice, vowel (MFCC)
  config/        settings (JSON), layout constants, theme, skin atlas geometry
  profile/       Profile + profile.json, library root, avatars, calibration, sessions
  session/       Session folder model + session.json manifest
  games.rs       registry of voice games (id + i18n name key)
  util/          lerp, UID + timestamp helpers
app/src/
  main.rs        entry point, window options, --x11, RONDELEK_SIZE
  app/           App struct + state machine (mod.rs), one file per screen
  camera/        desktop webcam capture (nokhwa)
  i18n/          runtime translations, language list, flags
  ui/            shell kit, settings page, characters, skin, layout, pad, renderer,
                 visualizers, level meter, widgets
  bin/           genskin (Classic skin), genarcadeskin (Arcade skin), genarcade
                 (README banner + arcade frames), genicon (app icon), genavatars + genpixelpals
                 (character placeholders), via pixelart.rs
game/src/
  lib.rs         game run loop + text-free control selection screen
  profile_picker.rs  reusable "who's playing?" screen, shown when started
                 without --profile (double-clicked / standalone)
  runner.rs      Vowel Runner
  voice.rs       mic + vowel detector → per-frame game input
  view.rs        what the camera sees: things come and go out of sight
  models.rs      embedded flat-draw GLB props (scenery, the score sun)
  shader_params.rs  shader tuning tables + JSON overrides
  lampula.rs     flat-draw's Lam::pula glass shader, 1:1 (clouds, sun, water)
  bricks.rs      brick models built in code: a grid of colours → one mesh
                 (bricks may be see-through)
  props.rs       the meadow, ledges, far planes and vowel tablets, in bricks
  obstacles.rs   the jungle's obstacles (log, tortoise, fallen tree, bamboo)
                 and the wall, in little bricks
  twinkle.rs     now and then a glint of sun on the jungle's bricks
  sway.rs        the wind in the jungle's palms
  brick_water.rs the voice-reactive water along the front: glass bricks
Curious what each dependency is for? Pop over to Libraries.
Audio routing
This is the page about how sound gets in, gets saved, and gets back out again. The one thing to hold on to: audio is mono end-to-end. Capture folds every input frame down to a single mono sample, and playback copies that one mono value to every output channel. That way pitch and duration never depend on how many channels a device happens to have.
Everything lives under core/src/audio/, which is GUI-free and shared with the
game:
| File | Responsibility |
|---|---|
capture.rs | Microphone input stream (Capture); folds to mono, buffers, drain(). |
playback.rs | Speaker output stream (Playback); mixes clips, resamples, monitor tap. |
sample.rs | The in-memory Sample buffer and WAV encode/decode (hound). |
device.rs | Device enumeration + the pure target/rebuild logic used by the watchdog. |
The two taps
The UI can listen to audio in two places, and the visualizer picks between them every frame (see The visualizer):
- Microphone tap: the live input. It’s always streaming while a
Captureexists. - Playback monitor tap: the exact mixed signal going to the speakers. It only records while a clip is actually playing.
flowchart LR
    mic([Microphone]) --> cap[Capture: cpal input callback]
    cap -->|drain each frame| micbuf[App.accumulated_samples]
    micbuf --> frame[AudioFrame]

    pad([Pad tapped]) --> pb[Playback: play + mix]
    pb --> spk([Speakers])
    pb -->|monitor tap| monbuf[App.playback_monitor]
    monbuf --> frame

    frame --> viz[Visualizer.update]
Capture path (microphone)
Here’s the journey from a child’s voice to a WAV file on disk:
flowchart LR
    mic([Microphone]) --> cb[cpal input callback<br/>input thread]
    cb -->|fold to mono, bounded push| buf[(shared VecDeque)]
    buf -->|Capture drain, each UI frame| acc[accumulated_samples<br/>~3s rolling]
    acc --> viz[Visualizer]
    acc -->|only while recording| samp[Sample.buf]
    samp -->|stop_recording| save[Session save_sample]
    save --> wav[(pad_NN.wav on disk)]
Step by step:
- The input callback (
Capture::open) folds interleaved channels to mono (fold_to_mono) and pushes them into anArc<Mutex<VecDeque<f32>>>. If that overflows, the oldest samples are dropped. - Each frame,
App::drain_capturepulls the buffer intoaccumulated_samples, a rolling window trimmed to about 3 seconds. - Recording appends the same raw mic chunk to the target
Sample.buf. When the pad is released (orEscis pressed),stop_recordingwrites it to disk throughSession::save_sample→pad_NN.wav(hound). - So recording is independent of the visualizer. You can change anything about how the signal is displayed without any risk to what gets recorded.
Playback path (speakers + monitor tap)
And here’s the way back out, when a child taps a pad to hear it:
flowchart LR
    pad([Pad tapped]) --> ps[App.play_sample]
    ps --> play[Playback play<br/>resample to output rate]
    play --> src[(sources queue)]
    src --> cb[cpal output callback<br/>output thread: mix + clamp]
    cb --> spk([Speakers])
    cb -->|active only, bounded push| mon[(monitor VecDeque)]
    mon -->|drain_monitor, each UI frame| pm[playback_monitor]
    pm --> viz[Visualizer]
Step by step:
play_sampleclones the sample buffer and callsPlayback::play. That resamples it from the sample’s own rate to the output device’s rate (resample_linear) and pushes it onto the sharedsourcesqueue.- The output callback mixes all active sources for each frame, averages
overlapping clips, clamps to
[-1, 1], and writes the result to every channel. - The monitor tap. Whenever at least one source is active for a frame, the
mixed value is also pushed into a monitor
VecDeque. When nothing is playing, nothing is pushed, so the monitor stays empty and the microphone gets to drive the display.drain_monitor()empties it each UI frame. - Clearing on stop. The app keeps a short rolling
playback_monitorwindow to feed the visualizer’s FFT. As soon asPlayback::is_playing()says there are no queued clips left,drain_captureclears that window. Otherwise the tail of a finished clip would sit frozen on the display and drown out a quiet microphone. (The tap only ever gains new samples while something is playing, so it would never age out by itself.)is_playing()reads thesourcesqueue, so it flips off the instant the last clip has been fully read, whatever the frame rate or audio buffer size.
Sample rates
There are two separate rates in play, which is why AudioFrame carries both:
- Capture rate: the input device’s rate (
Capture::sample_rate), kept asApp.capture_rate. Recorded samples are tagged with it. - Output rate: the output device’s rate (
Playback::output_rate). The monitor tap runs at this rate.
resample_linear (in playback.rs) bridges the gap on playback, taking a sample
from its stored rate to the output rate while keeping pitch and duration just as
they were. It’s a simple linear interpolator, and it’s unit-tested.
Device management & resilience
Microphones get unplugged and headphones come and go, so a small per-frame
watchdog keeps an eye on things. App::maintain_audio (throttled to about once a
second) keeps both streams pointed at the right device and rebuilds them when
needed. The decision logic is pure and lives in device.rs, where it’s
unit-tested. The side effects (actually opening streams) live in the app, in
app/src/app/mod.rs.
flowchart TD
    tick[maintain_audio, ~1s] --> pref[DevicePref from settings<br/>Auto or Pinned]
    pref --> target[choose_target: available + system default]
    target -->|Some| need{needs_rebuild?<br/>missing / dead / wrong device}
    need -->|yes| build[open new stream]
    need -->|no| keep[keep current stream]
    target -->|None: transient enum failure| alive{stream still alive?}
    alive -->|yes| keep
    alive -->|no| drop[tear down + report]
DevicePref::from_settingturns the saved preference intoAuto(follow the system default) orPinned(name).choose_targetpicks the device to use, given what’s available and what the system default is right now.needs_rebuilddecides whether the live stream has to be replaced.- If enumeration fails for a moment (
choose_targetreturnsNone), a healthy stream is deliberately kept rather than dropped, so a brief hiccup doesn’t cut the sound for a second. Only a stream that’s already dead or missing is torn down. - Grown-ups choose devices on the settings page (F12), in the Sound card. The
pinned input/output names are saved in settings (
serdedefault = Auto).
A full record → play cycle
To tie it all together, here’s one complete round trip, from holding a pad to hearing it played back:
sequenceDiagram
    participant U as User
    participant App
    participant Cap as Capture (in thread)
    participant Disk
    participant Pb as Playback (out thread)
    participant Viz as Visualizer

    U->>App: Space (REC mode), hold pad
    App->>App: start_recording(idx)
    loop each frame while held
        Cap-->>App: drain mic chunk
        App->>App: append to Sample.buf + accumulated_samples
        App->>Viz: update(AudioFrame) shows mic
    end
    U->>App: release pad
    App->>Disk: save_sample -> pad_NN.wav
    U->>App: (Play mode) tap pad
    App->>Pb: play_sample -> resample -> sources
    loop each frame while playing
        Pb-->>App: drain_monitor (played signal)
        App->>Viz: update(AudioFrame) shows playback
        Pb-->>U: speakers
    end
The visualizer
The visualizer is the little screen above the pads that dances along with the
sound. It’s a pluggable subsystem: the app owns a Vec<Box<dyn Visualizer>>
and cycles through it. Three implementations ship today:
SpectrumVisualizer, a dot-matrix spectrum,VowelVisualizer, a vowel meter,OffVisualizer, a restful blank screen.
The trait and the spectrum live in app/src/ui/visualizer.rs, and the vowel meter
is in app/src/ui/vowel_visualizer.rs. The vowel detector itself is GUI-free and
lives in core/src/audio/vowel.rs.
The interface
#![allow(unused)]
fn main() {
pub struct AudioFrame<'a> {
    pub input: &'a [f32],      // microphone tap
    pub playback: &'a [f32],   // playback monitor tap
    pub input_rate: u32,
    pub playback_rate: u32,
}

pub trait Visualizer {
    fn update(&mut self, frame: &AudioFrame, settings: &Settings);
    fn draw(&self, painter: &Painter, rect: Rect, theme: &Theme, settings: &Settings);
    fn demo_fill(&mut self, _num_bars: usize) {}   // for screenshots; default no-op
    fn set_calibration(&mut self, _cal: Option<VowelCalibration>) {} // active profile's; default no-op
}
}
App::drain_capture builds an AudioFrame from both taps (see
Audio routing) and calls update only on frames that brought new
audio. That way the smoothing and decay keep time with the sound, not with the
render frame rate. draw, on the other hand, is called every frame from
draw_session.
Source selection
Should the display show the microphone or what’s playing? SpectrumVisualizer::update
settles it simply: whichever tap is louder over the last FFT window wins
(louder_window). It follows the sound on its own, with no ties to the UI mode.
While a child records, the mic wins; while a clip plays, the (full-scale) playback
monitor wins. If it’s a tie, the mic gets it.
flowchart TD
    frame[AudioFrame: input + playback] --> e{louder window?}
    e -->|playback louder| p[process playback samples]
    e -->|else| m[process mic samples]
The spectrum DSP pipeline
flowchart LR
    win[last 1024 samples] --> hann[Hann window]
    hann --> fft[FFT 1024]
    fft --> mag[linear magnitude per bin<br/>512 bins]
    mag --> bands[group into log-frequency bands<br/>bar_bin_range]
    bands --> db[dB response<br/>level_from_magnitude<br/>floor..ceiling]
    db --> smooth[attack / release smoothing]
    smooth --> draw[dot-matrix draw]
Three design choices make the bars feel lively, and each one was learned by watching how the display actually behaved:
-
Logarithmic frequency bands (
bar_bin_range). FFT bins map to frequency linearly, but nearly all the energy in speech sits below about 4 kHz, in the bottom 18% or so of the bins. Grouping bins linearly bunched all the movement into the leftmost few bars. Log bands give each bar a geometrically wider slice of frequency, so the busy low end spreads out across many bars and the display fills nicely at any bar count. -
Decibel response (
level_from_magnitude). Our ears hear loudness logarithmically, so bar height is a dB mapping across a[floor, ceiling]window rather than a linear gain. The ceiling is fixed at −12 dB; the floor is adjustable and defaults to −60 dB. Normal speech lands in the lively middle, and loud input tops out gracefully instead of pinning. -
Attack / release smoothing. Rises use
visualizer_smoothing(a fast attack) and falls usevisualizer_decay(a slow release). It’s the classic peak-meter feel.
All of this is display-only. None of it ever touches the audio that’s recorded or played.
Tunable knobs (settings page → Sampler screen)
Open the settings page (F12), find the Sampler screen card and tick
Show advanced settings. You’ll find these:
| Control | Setting | Effect |
|---|---|---|
| Smoothness | visualizer_smoothing | Attack speed (higher = smoother rise). |
| How fast bars fall | visualizer_decay | Release speed. |
| Number of bars | visualizer_num_bars | Number of columns. |
| Sensitivity (dB) | visualizer_floor_db | The floor; lower = more movement. |
They’re saved in the settings JSON (see Data model).
Cycling between visualizers
Alongside its Vec<Box<dyn Visualizer>>, the app keeps an active_visualizer
index. The square button just left of REC (layout.cycle) calls
App::cycle_visualizer, which moves the index along (wrapping round at the end)
and saves it to settings. Only the active visualizer is fed audio (update) and
drawn each frame. Three ship today: the spectrum,
the vowel meter, and “off”.
Vowel detection
VowelVisualizer (ui/vowel_visualizer.rs) shows the Polish vowel it hears as a
big letter, with a match meter for each vowel (a e i o u y). It runs the one
and only detector against the active profile’s calibration. If a profile hasn’t
been calibrated yet, it kindly says so and asks for a calibration first (there is
no fallback).
The detector lives in core/src/audio/vowel.rs. It matches the shape of the
spectral envelope using MFCCs, and it deliberately does not use formants.
Estimating formants from a child’s high-pitched, short-vocal-tract voice is a
known ill-posed problem (LPC reports false formants at high f0), and it was the
reason the old detector was so unreliable. Comparing envelope shapes against the
child’s own templates steps neatly around it.
flowchart LR
    win[recent ~45 ms window] --> gate[voicing gate RMS]
    gate --> mfcc[MFCC: mel filterbank + DCT<br/>c0 dropped, 12 dims]
    mfcc --> cmn[cepstral-mean normalization<br/>running channel estimate]
    cmn --> cls[nearest calibrated template<br/>diagonal Mahalanobis]
    cls --> gate2[confidence + margin gate]
The choices that matter:
- MFCCs, from a proven crate. The features come from
spectrograms(a pure-Rust FFT). The only home-grown code is the roughly 20-line nearest-template classifier. If this ever needs onset or pitch detection, or a second opinion, you can swap the feature source for aubio viaaubio-rs(battle-tested C) and leave the template code exactly as it is. - Dropping c0 and cepstral-mean normalization remove the overall gain and the fixed colour of the microphone. Since the same mic is used for calibration and play, its colour cancels out on both sides (see How calibration works).
- A confidence and a margin gate (
vowel_show_threshold,vowel_margin_threshold) turn recognition into a firm decision rather than a flickering guess.
Grown-ups tune this on the settings page’s Voice recognition card: a Relaxed / Normal / Strict preset, and behind Show advanced settings the raw knobs (the voicing threshold, meter smoothing, how sure it must be before showing a vowel, the minimum margin, and steady mode). The detector is unit-tested by synthesising source-filter vowels, building templates from them, and checking that classification holds up and is unaffected by gain and mic colouring.
Calibration
New here? Have a read of How calibration works first. It explains the idea in plain language (and what it deliberately avoids), for anyone at all, grown-ups included. This section is about the implementation.
Detection needs a voice calibration, full stop: a child has to calibrate before the vowel view will work. A grown-up starts one from the Voice calibration key on the Hub, or from the settings page’s Profile card (Calibrate the voice):
flowchart LR
    say[hold each of the six vowels] --> cap[CalibrationCapture<br/>MFCC frames per vowel]
    cap --> pooled[pool all frames -> channel mean]
    pooled --> tmpl[per-vowel template<br/>mean + variance, channel removed]
    tmpl --> save[calibration.json<br/>templates + channel_mean + mic]
Calibration captures all six vowels and builds one MFCC template for each
(vowel::build_calibration):
- The mean MFCC across all frames is the channel (mic) estimate. It’s subtracted from every template, which takes the mic’s colour out.
- Each vowel’s template is the mean plus the per-dimension variance of its channel-normalized frames (with outlier frames trimmed). The variance drives the diagonal-Mahalanobis distance when matching.
- The calibration also remembers the
input_devicename, so the settings page’s Profile card can gently point out when a different mic is in use now.
The live detector (VowelDetector) starts its running channel mean from the stored
one and adapts slowly, so even the first frames match well. When a profile isn’t
calibrated, the vowel view shows “Not calibrated — set up the child’s voice
first” and matches nothing.
Here’s how the flow goes (app/src/app/calibrate.rs). begin_calibration →
draw_calibrate shows an overview grid of the six vowels, and recorded ones
turn green with a ✓. Tapping a vowel opens its record screen, where the child
records by holding a button (or Space). It’s push-to-talk, with no
auto-advance, so nobody gets hurried along. pump_calibration feeds voiced MFCC
frames into current only while the button is held. Letting go commits the take
to captured[i], as long as it has at least vowel::MIN_CAPTURE_SAMPLES frames (a
live level meter and a progress bar keep the child company while recording). Any
vowel can be recorded again just by opening it. Once all six are in, Save
calls finish_calibration, which builds the templates, writes calibration.json,
and calls apply_profile_calibration to hand the calibration to the visualizers
via Visualizer::set_calibration.
For screenshots, use RONDELEK_SCREEN=calibrate (and optionally
RONDELEK_CALIB_VOWEL=<0-5> to open a vowel’s record screen).
Adding a new visualizer
Fancy making your own? It only takes a few steps:
- Create a struct that implements
Visualizer(update+draw, anddemo_fillif you like). - Use whichever of
frame.input/frame.playbackyou need. The rates are there too, for visualizers with a time or frequency axis. - Add it to the
visualizersvector inApp::new. The cycle button picks it up by itself. - Update the
RONDELEK_VIZdocs and this page. (The savedactive_visualizeris clamped to the vector’s length, so nothing else needs to change.)
UI, layout & rendering
Come on in. This page walks you through everything you can see in the app: how the sampler lays itself out, how it gets painted, the arcade-style screens around it, and the grown-ups’ settings page.
The UI is built with egui / eframe, which is
immediate-mode. For the sampler that means there are no widget objects kept
around between frames. Every frame, the app looks at the live window rectangle,
works out the geometry from scratch and paints. That’s why the faceplate reflows
smoothly when you resize the window: there’s no fixed pixel grid to fight with.
Fluid faceplate layout
Here’s where all the sampler’s geometry comes from.
app/src/ui/layout.rs::compute_layout takes the available Rect and hands back
a FaceLayout holding every sub-rectangle for the frame. Everything is worked
out in proportion to the window, so there’s exactly one place to look when you
want to know where something sits.
flowchart TB
    case[case: bordered panel]
    case --> header[header strip]
    header --> back[back keycap - square, left]
    header --> avatar[avatar - square, centre, flush top]
    header --> rec[REC keycap - square, right]
    case --> screen[screen bezel - the visualizer]
    case --> pads[pad area: 4x3 square keycaps]
A few things worth knowing:
- The back and REC buttons are square keycaps of the same size, one on each side of the header. The profile avatar sits between them, also square, centred and flush with the top edge.
- The screen is where the active visualizer draws (
layout.screen). - The pads are a
PAD_ROWS × PAD_COLSgrid of square keycaps. They’re centred, and their size is capped so they don’t turn into giant slabs on a big window.
Rendering
The sampler screen doesn’t use widgets at all. It’s painted through a cloned
egui::Painter, and nearly all of it comes straight from the skin
spritesheet. Here’s who does what:
| Piece | Where | Role |
|---|---|---|
Skin | ui/skin.rs | Loads skin.png + skin.json; draws sprites, nine-slices and key caps. |
| atlas | core/src/config/atlas.rs | Fixed sprite rectangles inside skin.png (the contract with genskin). |
Renderer | ui/renderer.rs | The device case + screen bezel (skin nine-slices). |
Pad | ui/pad.rs | Pad state machine + input; drawn as skin caps with press sink, record pulse, LED. |
| widgets | ui/widgets.rs | Kid-face placeholder avatar. |
| visualizers | ui/visualizer.rs, ui/vowel_visualizer.rs | See The visualizer. |
The shell (every screen except the sampler)
Step outside the sampler and you’re in the shell. Home, Hub, the profile
form, voice calibration, the games menu and the settings page are all drawn with
the shell kit in ui/shell.rs. It uses the same arcade style as the
games’ entrance screens and the README pictures: a navy night sky with a slowly
twinkling starfield and 80s stripe bands, chunky notched keycaps with a hard ink
outline and a bevel, pixel titles, and vivid colours that still sit calmly on
the deep navy.
The palette and the pixel bitmaps (icons, plus the six bold lowercase vowels)
live as plain data in rondelek_core::arcade. The game’s raylib kit
(game/src/arcade.rs) reads the same data, so the app and the games can’t drift
apart. Each child’s card colour comes from there too (tile_color(uid)), so a
child is the same colour everywhere they look.
Two fonts, one for each audience. Words meant for kids (titles, big keys,
names) use the Tiny5 pixel font (pixel_font, the pixel family). Its sizes
snap to multiples of 9 so it stays crisp. Words meant for grown-ups
(descriptions, hints, form labels) stay in Space Grotesk, which is much nicer to
read in whole sentences. The vowels get special care: they’re never set in the
pixel font’s lowercase, which gets ambiguous when it’s blown up. Instead they’re
drawn from their own bitmaps (pixel_vowel, KeyButton::vowel).
Here’s what’s in the kit:
| Piece | Role |
|---|---|
install_fonts, apply_style | Space Grotesk + Tiny5 (pixel family); egui’s dark theme restyled for its stock widgets (navy surfaces, cream text, square corners). |
background, stripes, inside_stripes | The night sky + stars (twinkling on the app’s slow idle repaint, no extra frames), and the stripe bands, painted on a layer above the page so scrolling content slides under them. Screens lay out inside inside_stripes. |
draw_keycap, KeyButton | Arcade keycaps: hard shadow, ink outline, a bevelled face on a dark lip that sinks when pressed. Labels in the pixel font; KeyButton::vowel draws a pixel vowel. A key grows wider than its size when its label (in some language) wouldn’t fit. KeyButton implements egui::Widget. |
segmented | A row of keycaps acting as radio buttons; the chosen one is butter and framed. |
notched, panel, highlight, card | The 8-bit shapes: corner-cut rectangles, bevelled panels, the cyan “this one” frame (a line and an ink gap), and a card around ui content. |
paint_avatar, badge, tile_color | Avatar in an ink-framed well (photo, character or drawn face), square status badges, each child’s colour. |
pixel_text, pixel_icon, pixel_vowel | Pixel text with an optional hard shadow; the shared bitmaps. |
Icon, draw_icon | Vector icons (back, gear, mic, pads, star, …), with no icon font needed. |
title, hint, pixel_wordmark | Butter pixel headings over an ink shadow, dim secondary text, the 5×7 “RONDELEK” wordmark. |
Every clickable shell widget reports an AccessKit label. That’s how the settings page’s UI tests find the controls and click them, so please give your new buttons one too.
Each screen has its own file in app/src/app/: home.rs (“Who’s playing?”),
hub.rs (the child’s three big tiles), profile_form.rs, calibrate.rs (voice
calibration), games.rs, settings.rs (glue for the settings page) and
sampler.rs. The hub’s tiles make room for long labels with fit_label: one
line in the big pixel size if it fits, otherwise two lines split at the middle
space (“Calibrage / de la voix”), and failing that, the small size.
Character avatars
Not every child wants a photo, so there are characters to pick from.
rondelek_core::characters (core/src/characters.rs, shared with the games’
profile picker) embeds assets/avatars/<name>.png. You’ll find two sets, and
the picture picker offers both:
- the pixel pals (
pixel-fox,pixel-cat, …): vivid 32×32 pixel art in the arcade look, made bycargo run --bin genpixelpals, and listed first; - the classic smooth set (
fox,cat, …), made bycargo run --bin genavatars.
The app scales pixel pals with mipmaps and nearest-neighbour magnification
(characters::is_pixel), so their pixels stay nice and square. A profile stores
the character’s name (ProfileManifest::character), not the picture, so if
you replace a PNG, every profile using that character picks up the new one. See
assets/avatars/README.md.
Theming & fonts
- Skins own the sampler’s look: one
skin.pngspritesheet plusskin.jsoncolour overrides. Two come built in (ui::skin::BUILTIN): Arcade (genarcadeskin, the default when nobody has chosen one) and Classic (genskin,skins/base/, which is also the fallback for any file a skin leaves out).Skin::loadtakes the chosen name and tries, in order: an installed skin of that name, then the built-in, then the default. The grown-ups page lists Arcade, Classic, then any installed skins. Seedocs/SKINS.md. There is no dark mode. - Theme (
core/src/config/theme.rs) is the colour struct for the parts of the sampler that are still drawn in code (visualizers, LEDs, text). It starts from thetheme_light()defaults, and the skin’sskin.jsonoverrides them. The shell screens use the fixedshell::paletteinstead, so a wild sampler skin can never make the menus unreadable. - Fonts: Space Grotesk (OFL) is embedded and installed as the default
proportional + monospace family, with
egui’s default fonts behind it as a fallback so Cyrillic and Greek still render. Tiny5 (OFL, pixel) is thepixelfamily for the shell’s kid-facing words, and it covers every shipped language on its own. (This all happens inshell::install_fonts; the settings page’s UI tests install the fonts too.)
Internationalization
The app speaks several languages, and i18n/mod.rs is where it learns them:
assets/i18n/en.jsonis the source of truth;pl, de, fr, es, it, ukare seeded locales. A test fails if the keys drift apart between them.- Lookup goes active locale → English → the key itself, so a missing translation shows English rather than nothing.
- The system language is detected once, on first run (
sys-locale), and saved to settings. The flag key on Home opens the settings page right at its language grid. - All locale JSON and picker flags are embedded in the binary.
SUPPORTED_LANGS(core/src/config/settings.rs, which picks the first-run language) must list the same codes asEUROPEAN_LANGS(app/src/i18n/mod.rs, the picker). Keep the two in step by hand.- Dates shown to grown-ups go through
ui/when.rs(when::friendly): local time viachrono, as “Today, 14:05” / “Yesterday, 09:12” / “26 September, 14:05” (the year appears only when it isn’t this year). The word order and the month names are translations too (when.*), so German reads “26. September” and Spanish “26 de septiembre”.
When you add or change any user-facing string you must update
en.jsonand every seeded locale. See Contributing andAGENTS.md.
The settings page (“For grown-ups”)
This is the grown-ups’ corner. ui/settings_page.rs is one scrolling page of
cards. It replaced the old F12 settings window, and there are no pop-up windows
left anywhere. You open it with the gear key (on Home and Hub) or F12, and the
back key takes you back to wherever you came from. Each card tells you whether
it affects only this profile or everyone on this computer.
| Card | Controls | Settings fields / data |
|---|---|---|
| Profile (only with a child selected) | edit name/picture, voice calibration status + calibrate again, delete the profile (type the name to confirm; moves to .trash) | profile.json, calibration.json |
| Sessions (only with a child selected) | the child’s sessions, newest first: friendly date, “n of 12 pads recorded”, the one Sounds carries on with marked and keyed Continue, Open on the others; the latest five (plus the current one) until “Show all”; New session with empty pads | sessions/*/session.json (read via Profile::list_sessions) |
| Sound | speaker, volume, test chime, microphone, live level meter | output_device, volume, input_device |
| Voice recognition | Relaxed / Normal / Strict presets (DetectionPreset); “advanced” shows the raw knobs | vowel_* |
| Sampler screen | spectrum / vowels / off; advanced spectrum knobs | active_visualizer, visualizer_* |
| Games | steadier ↔ snappier | game_reaction |
| Look & language | language flag grid, sampler skin | language, skin |
| About & data | version, open data folder |
The page itself only edits Settings. Anything bigger comes back as a
SettingsOutcome full of requests (switch language, load skin, delete child,
open a session, play a chime, …), and the app carries them out in
app/settings.rs. Opening a session first closes (and saves) any session that’s
already open, so it works even when the page was opened from the sampler.
Why the split? It keeps the page easy to test. settings_page::tests renders it
headless with egui_kittest, clicks controls by their labels and checks what
ended up in Settings. Changes save straight away; there’s no “Apply” button to
forget.
Level meter & camera
- The level meter (
ui/level_meter.rs) is an input-level bar with a translated status line underneath (too quiet / OK / too loud). You’ll see it in voice calibration and on the settings page. - The camera (
camera/mod.rs) shows its live preview inline in the profile form, at the webcam’s native aspect ratio, with a centred square crop guide so you know what ends up in the avatar.
Data model & storage
Rondelek keeps everything as plain files that belong to the user. There’s no
database and no network, just folders you can open and look inside. There are
two roots, and both are found through the dirs crate.
The profile library
The library lives under the OS data directory (dirs::data_dir()). On macOS,
for example, that’s ~/Library/Application Support/rondelek/profiles/:
profiles/
  <slug>-<short-uid>/            one child
    profile.json                 { uid, name, avatar, character?, created }
    avatar.png                   optional photo, square, 256px
    calibration.json             optional, per-child vowel calibration
    sessions/
      2026-07-01_22-11-06/       one practice run (timestamped folder)
        session.json             { uid, name, created, modified, last_opened, pads[] }
        pad_01.wav               a recorded sample (mono, device rate)
        pad_05.wav
        ...
A few house rules:
- Folder names never use the child’s raw name. A profile’s folder is
<slug>-<short-uid>(profile::slugplus a short UID), and sessions are named by their timestamp. The display name only lives inside the manifest, so renaming a profile does not rename its folder. - Profiles and sessions both carry a stable
uid, ready for cross-referencing later on (notes, search). - Avatars are always stored square. Any uploaded or captured image is
centre-cropped and resized to 256px (
profile::square_avatar). - Instead of a photo, a child can pick a built-in character.
characterholds its name (e.g."fox"; seerondelek_core::characters). A photo and a character replace each other. The field is optional and left out when unset, so older manifests and older app versions carry on happily. - Deleting a profile (from the settings page) calls
Profile::move_to_trash. The whole folder moves toprofiles/.trash/<folder>-<unix secs>/, whichlist_profilesignores. Nothing is actually erased, so if a profile was deleted by mistake, moving the folder back puts everything right.
flowchart TD
    lib[profiles library] --> prof[Profile: profile.json + avatar.png]
    prof --> sess[Session: session.json]
    sess --> pad[PadEntry x NUM_SAMPLES]
    pad --> wav[pad_NN.wav if recorded]
Calibration
calibration.json (vowel::VowelCalibration) is written once a child finishes a
voice calibration. It holds:
- six MFCC templates (
mean+varper vowel, indexed likevowel::VOWELS), - the
channel_mean(the mic estimate removed from every template), n_mfcc,sample_rateandmin_vowel_rms(the adaptive voicing gate),- the
input_devicethat was used, - a format
version, andcreated.
If the file is missing, or has an older version (such as the pre-MFCC formant
format), it reads as “not calibrated” and the child is simply asked to calibrate
again. For how it’s built, see
The visualizer → Calibration.
Manifests
profile.json(profile::ProfileManifest):uid,name(the sanitised display name),avatar(the photo’s filename, or none),character(an optional built-in avatar name) andcreated.session.json(session::SessionManifest):uid,name,created,modified(the last recording),last_opened(the last time it was opened in the sampler;0or absent in manifests from before it existed), and apadsvector ofPadEntry { label, file, has_sample }, always normalised to exactlyNUM_SAMPLESentries. All times are Unix seconds (UTC); the UI shows them in local time.Profile::list_sessionsreads each manifest field by field (so a broken one still shows up) into aSessionInfo, newest created first, along with a count of recorded pads. Note that the session Sounds carries on with is the one most recently used (profile::most_recently_used, the latest ofcreated/modified/last_opened), not simply the newest.
Both manifests are written with serde_json pretty-printing. Missing or legacy
fields fall back to serde defaults, so older manifests keep loading just fine.
Settings
Settings live under the OS config directory (dirs::config_dir()); on macOS
that’s ~/Library/Application Support/rondelek/settings.json. It’s a single
config::Settings document holding:
- the volume,
- the active
skin(null= the default, Arcade;"base"= Classic; anything else is an installed skin’s folder name), - the visualizer knobs (
visualizer_smoothing/_decay/_num_bars/_floor_db), - the vowel-detection knobs (
vowel_voicing_threshold/_smoothing/_show_threshold/_margin_threshold/vowel_steady), - the
active_visualizerindex,game_reaction, the UIlanguage, - and the pinned
input_device/output_devicenames.
This file already exists on people’s machines, so loading it is deliberately
forgiving (Settings::load_from):
Settingshas a container-level#[serde(default)], so any missing field takes its value fromSettings::default().- If the file doesn’t parse as it is (say, one field has the wrong type), it’s
first copied to
settings.broken-<unix secs>.json. Then every field that still deserializes is kept, and only the bad ones fall back to defaults. A file that isn’t JSON at all gives you defaults, with the original safe in the backup. - Saves are atomic: write a temp file, then rename it over
settings.json.
Two processes write this file. The game owns game_reaction: it reloads the
file, changes only that one field, and saves. When the app reaps the finished
game child, it picks up game_reaction from disk, so its next save doesn’t write
back a stale value.
The guard test current_settings_file_loads_unchanged parses a complete
present-day file (core/tests/fixtures/settings-2026-09.json). Please never
remove or retype a field without a migration and a test that parses the old
shape, and rename fields with #[serde(alias = "old_name")].
What is embedded vs on disk
| Embedded in the binary | On disk (user-owned) |
|---|---|
| Fonts, translations, picker flags | Profiles, sessions, recordings (WAV) |
| Base skin, game shaders, 3D models (GLB), character avatars | User settings (JSON), user skins |
| Pad identities, theme defaults, layout constants (Rust source) | Per-child calibration |
Voice games
This is the fun part. The voice games are where the vowel engine stops being maths and starts being play: a child says “a” and the hero jumps.
The games live in their own crate, game/ (rondelek-game), built on
raylib, and they run as a separate process next
to the app. On this page you’ll see how a game is put together, how Vowel
Runner is drawn, where its art comes from, and how its shaders are tuned. If
you’d like to write a game of your own, there’s a section on that too.
The frame around every game
Every game sits inside the same frame. Here’s what it gives you:
- A process of its own. The app releases the microphone, starts
rondelek-game <id> --profile <dir>from the folder its own exe lives in, and stops repainting until the game exits. raylib and eframe can’t share one exe on Windows, which is whygamemust never depend onapp(see Architecture). - It runs standalone too. With no id, the game binary starts the first entry
of
rondelek_core::games::GAMES. With no--profile, it first shows the “who’s playing?” picker (game/src/profile_picker.rs). - The loop (
game::runingame/src/lib.rs). First comes the text-free control screen (select_controls), where a grown-up assigns a vowel to each move, toggles obstacle kinds on and off, sets the turtle↔rabbit reaction slider and presses ▶. Then a 60 fps loop polls the voice and hands the game aVoiceInputevery frame. The control screen listens only once the press that opened it is let go (InputGate): a screen returns mid-frame, before raylib polls input again, so the picker’s Enter or click would otherwise land on the control screen too, starting the game before anyone saw it. VoiceGameis the trait a game implements:init(GPU resources, given the raylib handle),update(&VoiceInput, dt)(the gameplay, kept raylib-free so it can be unit-tested headless) anddraw.- Voice (
game/src/voice.rs,VoiceBridge) is the capture stream plus the child’s calibratedVowelDetector, gated the same way as the sampler’s vowel visualizer.VoiceInputcarriesheld(the vowel being voiced right now),onset(its first frame), per-vowelscoresand the rawlevel. The keys A E I O U Y can stand in for a voice, which is handy when you’re testing at a quiet desk, and it’s also how headless recordings drive the game.
The entrance screens: arcade style
Before play starts there are two screens: “who’s playing?”
(profile_picker.rs) and the control screen (select_controls in lib.rs).
They share the 8-bit “chrome” of the README’s pictures (and, these days, of the
app’s shell too). It comes from game/src/arcade.rs, which draws using the
shared data in rondelek_core::arcade:
- Palette:
genarcade’s colours (navy night, orange, butter, pink, cyan, cream) plus vivid card colours,arcade::TILE_COLORS. A child keeps the same colour family they have in the app (same order, viastable_pick), just a little brighter. - Backdrop:
sky(navy plus a starfield whose stars twinkle slowly, each on its own cycle) andstripes(the 80s bands along both edges, drawn last on the scrolling picker so they frame it). - Shapes: everything sits on a grid of
preal pixels per 8-bit pixel (pixel_unit), so it stays crisp at any window size. There arenotchedrectangles (corner pixels cut off),panel(an ink outline plus a light/dark bevel), andhighlight(a coloured line and an ink gap, like the cabinet’s screen well) to say “this one”. - Pixel icons are small bitmaps written as
#rows: ▲ ▼ ★ ▶, a bold “?”, check, mic, heart, cursor, turtle, rabbit. The vowels get their own bold lowercase bitmaps (vowel_glyph) on a shared baseline. The pixel font’s lowercase reads ambiguously when blown up (its “a” looks like a “d”), and these are exactly the letters a child is learning, so they have to be clear. - Text (only the children’s names) uses Tiny5 (OFL,
assets/fonts/Tiny5-Regular.ttf). Its glyphs sit on a 9-row grid, so it’s loaded at size 9 (one texel per font pixel) with nearest-neighbour filtering and drawn at whole multiples. It covers Latin with every shipped accent, plus Cyrillic, which fixed the picker’s old missing-glyph Ukrainian names.
These screens stay text-free, so they need no translations: a pixel “?” between two stars means “who’s playing?”, and ▶ means start. The only motion is the slow twinkle and a one-pixel bob of the focus cursor.
Adding a game
Got an idea for a new game? Here’s the checklist:
- Write a new file in
game/src/with a type that implementsVoiceGame. - Add an arm for its id to the
match idingame::run. - Register it in
rondelek_core::games::GAMESwith aGameInfo: itsid, plus the i18n keys for its name and its one-line tagline (name_key,tagline_key). - Add those keys to every locale, all seven of them. The i18n parity test will let you know if you miss one.
Some things come for free. Every game gets the “who’s playing?” picker
(profile_picker::choose_child) when it’s launched without a profile, the voice
plumbing, and the 60 fps loop, all through game::run.
One thing doesn’t come for free yet: the pre-game selection screen is still
Runner-specific. select_controls returns the Runner’s moves and its obstacle
toggles, so it will need generalising before a second game can use it.
Vowel Runner
The hero runs all by themselves; the child only has to speak. One vowel jumps (a second one in mid-air is a “ninja” double jump with a salto), holding another ducks, and a third shoots a spinning star. There are four obstacle kinds: a low one (jump it: a log or a sleeping tortoise, taking turns), a bar (duck under it: a fallen tree), a wall (shoot it) and a tall one (double jump it: bamboo). Nothing ever fails: an obstacle you bump into just bounces away, and every obstacle you clear earns a point.
The kinds are dealt from a shuffled bag (next_kind): each round holds every
kind the grown-up switched on once, in a fresh order, and a new round never
starts with the kind just dealt. So every vowel gets its turn often and evenly;
a plain random pick once left the first wall 18 obstacles in. Each game seeds
its generator from the clock, so no two games run the same course (the tests
keep a fixed seed).
A point needs the move the obstacle asks for, so no vowel can be skipped
(Kind::earns_a_star). Leaping over a bar instead of ducking, or
double-jumping over a wall instead of shooting it, gets the hero past
untouched but earns nothing. While an obstacle and the hero overlap along x,
the obstacle notes whether the hero was ever in the air or ever ducking, and
that decides it when it has gone by.
Ledges and little suns
Now and then a ledge pattern takes an obstacle’s turn (LEDGE_CHANCE,
never twice running, so a ledge and an obstacle never share a stretch): a long
low ledge, a high one, or a staircase from a low ledge up to a high one. Over
each ledge float little suns, the score sun small and turning slowly,
each one a point when the hero touches it. Unlike a cleared obstacle, a little
sun doesn’t speed the game up.
Ledges are one-way, like Mario’s: the hero jumps up through one from below and
lands on it only on the way down. floor_below is the whole trick. It’s the
highest surface under the hero’s feet that the feet were already above
(the ground, or a ledge the hero overlaps along x), and the hero lands on it
only while falling. A ledge that slides out from under the feet drops the
hero back down. The low ledge (LEDGE_LOW, 180 px) takes a single jump (apex
about 238 px) with room to spare and floats clear of the hero’s head; the high
one (LEDGE_HIGH, 300 px) needs the double jump, or a hop from the low ledge
of a staircase. A test holds these numbers to each other.
Gameplay runs in a 1280×720 logical space (update), and drawing maps that to
world units (100 logical px = 1 unit).
The scene, back to front
The camera rests in perspective at (0.9, 2.2, 12.5) (CAMERA_AT), looking
at (0, 1, 0), with a fovy of 45°. It never moves sideways. Instead, each layer
scrolls by its own hand-tuned fraction of the distance travelled, so the world
seems to glide past while the camera stays put.
It does follow the hero up and down, and it aims ahead rather than chasing.
While the hero rises, it aims at where this jump will top out (the physics
knows at take-off); once they fall, or stand, at where they’ll come to rest:
the ground, or a ledge. It rises by CAM_FOLLOW (about a third) of that
height past a small dead zone (CAM_DEAD, so a little hop leaves it still),
never more than CAM_LIFT_MAX, on a critically damped spring that never
overshoots: up in step with the jump (CAM_RATE_UP), and back down unhurried
(CAM_RATE_DOWN; a quicker return snapped back too hard). So it sets off with
the take-off, turns at the top, and is on its way down as the hero lands. The
first version chased the hero’s height on one slow spring instead: it lagged a
quarter of a second behind every jump and was still rising as the hero fell,
so it was never in step, and the game felt like a ship at sea. Both where the camera stands and where it looks move together, so
nothing tilts. The scene is truly 3D, so rising shows it from a little higher,
and the near things slide down further than the far planes: vertical
parallax, for free. A test holds it in step with the jump (topping out within
0.15 s of the hero), smooth, and easing back after landing: not snapped down,
most of the way within a second, at rest within three.
Coming and going out of sight
Nothing pops up or vanishes on screen. game/src/view.rs describes the camera
as plain geometry (Eye): where the picture’s left and right edges fall at a
given depth and height (they lean a little, since the camera looks down and in
from the side), for whatever shape the window has and wherever the camera has
risen to. Everything the runner adds takes up a box in the world (Bounds),
with all it carries: an obstacle’s tablet (hopping and bobbing at its highest),
the little suns over a ledge, a bullet’s whirling cubes (obstacle_bounds,
ledge_bounds, …). A new thing is placed with all of its box just past the
right edge (Eye::entry, plus view::MARGIN); it’s dropped only once all of
it is past the left edge (Eye::gone_left), and a bullet once it’s past the
right (Eye::gone_right). The far planes’ tiles and the cloud lanes are laid
across the same edges (Eye::span), so a wide window never sees their ends.
(Things used to come in at a fixed logical x, 1400, which a 16:9 picture
already shows: tests now hold every kind of thing to entering out of sight at
4:3 to 21:9.) A new game gets this by giving its things boxes and asking its
Eye.
| Layer | Where | How it’s drawn |
|---|---|---|
| Sky | behind everything | 2D gradient SKY_TOP → SKY_LOW (a clear blue day) |
| Clouds | z −14, parallax 0.10 | cloud.glb (flat-draw) through Lam::pula glass, gently floating and breathing |
| Haze | — | the sky gradient again, see-through, in front of each far plane (see below) |
| Mountains | z −12, parallax 0.16 | code-built bricks (props::mountains): a blue-violet range with snowy peaks rising high over the jungle, some in front of the clouds |
| Valley mist | — | a white band rising from the mountains’ feet |
| Palms | z −10.25, parallax 0.23 | code-built bricks (props::GROVE): a grove of palms, every one its own, their crowns in mist above the jungle |
| Jungle | z −5, parallax 0.36 | code-built bricks in the round (props::jungle): a rainforest of trees, palms, bushes, big leaves and ferns |
| Valley mist | — | a thin band at the jungle’s feet, out of which the meadow comes |
| Meadow & bank | z 0, parallax 1.0 | code-built bricks (props::ground): a grass top over layered earth, tile after tile, through Lam::pula |
| Water | z 1.5 → 8.5 | little glass bricks rising and falling on a swell, through Lam::pula like the clouds; scrolls with the ground |
| Obstacles | z 0 (a fallen tree’s boulders behind) | code-built bricks (obstacles.rs): a mossy log and a sleeping tortoise, a fallen tree on boulders, a brick wall, bamboo, through Lam::pula |
| Vowel tablets | z −0.75 (floating), or on a tall obstacle’s front | code-built bricks (props::tablet): a white temple stone with the vowel carved in, through their own white-lit Lam::pula |
| Ledges, little suns | z 0 | floating strips of meadow bricks (props::ledge); sun.glb, small, through the sun’s Lam::pula |
| Stars (bullets) | z 0 | procedural cubes |
| Hero | z 0 | the blocky brick hero under the toon shader |
| Score sun | 3 units in front of the camera | sun.glb through its own Lam::pula, the count on its face |
| HUD | 2D | point sparks, the vowel meter (and flat vowel signs, only if the tablets fail to build) |
Design rules for the scene
The child’s attention belongs to the hero and the obstacles. Everything else is there to be pleasant and then get out of the way. So:
- Scenery stays calm. Background motion is small and slow. The clouds float by a few pixels and breathe by 1.5%, and they don’t tilt: a sway was tried, and it made heads spin and the glass glints flicker. The water was slowed and softened for the same reason, and its bricks only rise and fall: they slide along with the ground, and no brick ever tilts.
- Scenery recedes. The haze passes are atmospheric perspective: distant things take on the sky’s colour. Each is simply the sky gradient drawn once more, see-through, so it’s invisible over bare sky and softening over everything drawn before it.
- Reward, don’t punish. Points spin the sun; bumps just bounce the obstacle away.
- Voice is welcome in any form. The hero’s mouth opens with any sound, and
the water swells and sparkles more while the child is making sound (a
smoothed level,
voice_glow: quick up, slow down). Babbling counts.
The score sun and its count
The score is a pixel sun drawn in flat-draw (sun.glb). It’s a real 3D prop, floating SUN_DIST in front
of the camera along the ray through its HUD spot, and turned to face the camera.
Each point adds a full turn to a spring’s target (SunCoin), so the sun whirls
round, swings a little past and settles. Quick points add more turns rather than
restarting the spin. A jelly scale pop and a ring of “+” sparks come along for
the ride.
The count is printed on the sun’s face, like the value on a coin. It uses
raylib’s pixel font, cream with a warm outline, drawn in the 3D pass with the
sun’s matrix on rlgl’s stack, so the number turns with the sun.
SunCoin::shown swaps the number while the face is turned away, so the sun
comes back round already showing the new count (one reveal per turn, tested).
Two raylib details that are easy to trip over:
- raylib-rs 6’s
rl_mult_matrixfpasses the matrix transposed. It casts theMatrixstruct (fields laid out m0, m4, m8, m12, … row by row) straight to the column-majorfloat[16]thatrlMultMatrixfreads, which loses the translation. Passm.transpose(). - Text in 3D is drawn with the depth test off, fenced by
rlDrawRenderBatchActiveon both sides. Otherwise the see-through corners of the glyph quads hide the light fill behind its own outline.
Where the art comes from
- flat-draw (a Go + raylib pixel editor, also called Flatty) draws 2D pixel
art and exports extruded 3D layers as
.glb, with the texture atlas inside. A drawing the game uses goes intoassets/models/<english-name>.glb. game/src/models.rs(FlatModel) embeds each GLB in the binary and loads it through a temp file (raylib has no load-from-memory for models). It merges the per-layer meshes into one mesh (one draw call per prop), and records the bounding box and the pixels-per-unit. Newer exports carry nomeshes.json, so pixels-per-unit is recovered from the geometry: the smallest step between vertex coordinates is one drawn pixel.FlatModel::latticerebuilds the model → pixel-lattice map that flat-draw’sbrickMatrixgives its brick shaders.- Shaders go in per draw (
FlatModel::draw_shaded,models::draw_mesh_with). The material is copied with the shader swapped in, never changed in place. A shader set on a model’s material gets freed by raylib when the model unloads, which would be a double free with our ownShader.
The models are cloud.glb (a faceless cloud) and sun.glb.
Shaders
| File | Used for |
|---|---|
base.vs + toon.fs | the hero: banded comic shading |
flatdraw_model.vs + lampula.fs | Lam::pula, copied 1:1 from flat-draw: clouds and the sun |
brick_water.vs + lampula.fs | the brick water: our vertex stage in front of Lam::pula, unchanged |
jungle_sway.vs + lampula.fs | the jungle, its palms in the wind: our vertex stage in front of Lam::pula, unchanged |
sun.vs + sun.fs | the sun’s fallback if Lam::pula won’t compile |
Lam::pula, 1:1 from flat-draw
Lam::pula is flat-draw’s tinted-glass shader. It renders the model as one piece of glass in the artwork’s own colours, lit by three warm lamps standing round it, with highlights, a reflected “room” at the silhouette, and star-shaped glints at the brick corners.
lampula.fs is flat-draw’s lampFS and flatdraw_model.vs is its modelVS,
copied verbatim. Each file names the flat-draw commit it came from, and a
test guards the copy. So please don’t edit them to change the look; tune the
parameters instead.
The look’s switches (lamp0On, sparkOn, specOn, …) are compiled in: the
copy of lampula.fs handed to the driver has each uniform float u…On; turned
into a constant (compiled_fs), so the terms a switch turns off (the far
planes’ sparks and highlights, the lamps’ orbit everywhere) are dropped
instead of being computed for every fragment and multiplied by zero. The
values stay uniforms; the switches are set once, at load.
game/src/lampula.rs feeds in the same uniforms flat-draw’s Mesh.lampula
does: the eye, the clock, the instance’s bounding box (the lamps stand round
it) and uBrick, the world → pixel-lattice map. Lampula::draw takes any
FlatModel under any transform, so anything drawn in flat-draw can go through
the glass. Lampula::draw_mesh takes any other mesh, given its brick lattice
and where its lamps stand (a box fixed in the world, so something that scrolls
slides under still lamps), and Lampula::load_with_vs puts a vertex stage of
your own in front of the unchanged lampula.fs (the brick water does both).
Each use gets its own instance and look:
cloud_glass(): flat-draw’s defaults, except the “room below” is the horizon blue (flat-draw’s dark floor made the clouds muddy).sun_glass(): the same for now, kept separate so the sun can be tuned on its own.water_glass(): the clouds’ glass with only the light changed. Gold lamps turned the blue water murky green and white ones washed it pale, so its lamps are a clear sky blue; the room it reflects is the sky above and a deep sea below.world_glass(): the meadow and the obstacles, solid and toned down (see below).
The water
The water is made of little glass bricks, like the clouds above it
(game/src/brick_water.rs). One mesh holds a column of bricks for every
WATER_CELL (0.25 units, about a cloud brick on screen) from the bank’s face
to just past the bottom of the screen: about 3,600 columns, one draw call.
Only the faces that can ever be seen are built (tops, fronts, sides).
The columns are only as deep as the eye needs (row_depth). Through the glass
a pixel shows the top it lands on and, each fainter than the last, the fronts
of the columns behind it; past the fourth (FACES_SEEN) they add nothing but
cost. Out by the bank the water is looked at aslant, so one brick of depth
already holds four faces; up front it is looked down on, and the rows go two
bricks deep. The depths are set at load from where the camera rests, and are
never shallower than the swell needs to keep a column’s bottom out of sight
behind its neighbour (bounded by the swell’s steepest wave, SHORT_WAVE).
What a pixel sees past the last face is painted water-blue (UNDER_WATER in
the runner, below the meadow’s edge), so a shallow column still looks deep.
The lamps stand round a fixed box (LAMP_BOX_BRICKS), so the light doesn’t
depend on the depth.
brick_water.vs lifts every column on a gentle swell rolling toward the bank,
so a column a little higher than the one
in front shows its side, and the waves read as steps of bricks. It also picks
each brick’s colour: toon steps from shallow at the bank to deep further out,
a little jitter per brick so the steps come out dithered like pixel art, and
white foam bricks lapping at the bank and riding the crests. The colours sit
in a 2×2 palette texture (shallow, deep / foam, foam) that the vertex stage
points into, since the texture is the only colour lampula.fs reads.
The light is Lam::pula’s, through the very same lampula.fs. Two tricks
make a shader written for still drawings work on moving water:
fragWorldis each brick’s resting place. Lam::pula finds the brick edges and corners by mappingfragWorldonto the lattice, so a brick that has bobbed up keeps its own edges and corner glints. (The light hardly notices: the swell moves a brick by a few hundredths of a unit.)- The bricks slide along with the ground by less than one brick, then hop back
by exactly one as the pattern moves on by one. The hop can’t be seen, and
the lattice (
uBrick) moves with the mesh, so it never leaves the bricks.
While the child makes sound, the swell grows (voiceSwell) and the corner
glints get brighter (voiceSpark scales Lam::pula’s sparkGain).
It scrolls with the ground, and every x-frequency is a whole number of turns
per PERIOD, the distance the scroll wraps on. That way the surface never
jumps at the wrap (a test parses every kx(n) to make sure), and WATER_CELL
must fit PERIOD a whole number of times (tested too).
The far planes: mountains, palms and jungle
Behind the meadow lie three far planes, 90s style: continuous bands, each at
its own depth and scrolled at its own rate, each hazed toward the sky by how
far away it is, so the farther a plane lies, the more it looks like the sky.
All are code-built bricks (props::mountains, props::palm_grove,
props::jungle), laid tile after tile like the meadow (lay_tiles), and lit
by backdrop_glass(): the meadow’s glass without glints or highlights, so
nothing out there pulls the eye (bar the jungle’s odd twinkle, on purpose:
see below). The mountains and the palms are pixel-art
silhouettes extruded a brick or few deep, the way flat-draw turns a drawing
into a prop; the jungle, the nearest, is built in the round.
-
The mountains (0.4-unit bricks, z −12): a paler back range with four big snowy peaks and smaller shoulders, behind a darker ridge of rolling foothills, each slope shaded on the side away from the sun. The slopes step two bricks along for one up, never steeper: sheer columns of bricks read as a city. The big peaks rise high into the clouds’ band, well over the jungle’s canopy, and the depth test puts them in front of a cloud now and then.
-
The palms (
GROVE, 0.25-unit bricks, z −10.25), a plane of their own sliding by at its own pace behind the jungle, which hides all but their crowns.props::palmsmakes every palm its own: short to tall, straight or leaning — the leaners by turns one way and the other, their trunks bending upright toward the crown like a coconut palm’s — with 6 to 9 long fronds fanned out to both sides, rising and then drooping past level, leaflets along their outer halves, ringed trunks, coconuts under most crowns. The crowns rise above the camera, so the grove is built with every face (their undersides show). Its distance comes from the mist it stands in, not its colours: recoloured toward the mountains’ blue, it stopped reading as palms. (A second, farther grove was retired when the jungle grew tall: it crowded the scene.) -
The jungle (0.25-unit bricks, z −5, 10 deep), the way a film’s rainforest is, in rows from the back: a dark heart of leaf masses in deep shade (so between the trunks there’s jungle, not sky); tall trees with pale trunks flaring into buttress roots, round canopies spilling into each other and lianas hanging in front; palms rising through the canopy, their long fronds hung with leaflets breaking the skyline; darker bushes between; and big-leaved plants and ferns crowding the floor at the front. The leaf masses are ellipsoids of bricks (
jungle_plants,shade_lobes), each brick shaded by where it sits on its own mass (sunlit up and to the left, shaded below, darker toward the ground and the back) and darker still in the creases where masses meet, so each reads as a ball of leaves rather than a cut-out. Leaves and fronds are drawn brick by brick along arcs (Jungle::leaf,Jungle::frond). A tile is too leafy for one mesh, so it builds into several (see below); it stays light, though, about 72,000 vertices.Its front plane is glassy (
props::veil), the way the score sun’s glass is. From halfway back (VEIL_FROM) to the front, the palms, big leaves and ferns go see-through, more the nearer they stand (up toVEIL_MOST, 75%), in drifts rather than brick by brick: a tileable Perlin noise (gradient_noise, two octaves,VEIL_GRAINbricks across) decides where, so a clump goes glassy together while its neighbour stays solid. The trees and the dark heart behind stay solid; trunks and lianas show faintly through the glass in front of them. Each brick’s opacity is worked out once, when the tile is built, in sixteenths (the barely veiled round back to solid), so it costs nothing per frame: see the see-through bricks below.
All start below the meadow’s sightline (MOUNTAIN_BASE, the grove’s base,
JUNGLE_BASE), so no floor ever shows under them. The draw order does the
rest:
- the sky, then the clouds;
- a haze pass, then the mountains;
- a haze pass, then valley mist at the mountains’ feet (
MOUNTAIN_MIST: a white band, clear a little way up and thick at the foot); - the palms, then a haze pass and their mist (
PALM_MIST), which stands high, up in their crowns: the tall jungle in front hides everything lower, so a mist at their feet would never be seen; - the jungle (its palms in the wind) and its twinkles, then a last haze pass
and a low, thin mist at the jungle’s feet (
JUNGLE_MIST), out of which the meadow comes.
All five are scissored to the rows above the meadow’s far edge
(meadow_top_on_screen): below it, the meadow, its bank and the water cover
the picture anyway, and each haze or mist pass is a whole-screen fill.
The hazes are set as how far each plane ends up pulled toward the sky
(CLOUD_HAZE, MOUNTAIN_HAZE, PALM_HAZE, JUNGLE_HAZE),
and haze_step works out the
pass in front of each plane from them, since a plane behind also gets every
pass in front of it. The clouds’ figure is the one they had before the planes
came, so they look just as they did.
Twinkles on the jungle
Now and then a glint of sun catches one of the jungle’s bricks
(game/src/twinkle.rs): one or two at a time, never more. Every couple of
seconds (GAP) a twinkle starts, and two times in five (PAIR) a second one
follows close behind (FOLLOW). Each picks a brick the camera sees straight
on (its column’s front-most, from JUNGLE_TWINKLES_FROM up, clear of the
meadow and the mist), in sight and a fifth in from either side, and stays on
it as the jungle scrolls. A soft star of pale, leafy green (LIGHT) gleams
up on a corner of the brick’s front face, quickly, then fades over LIFE
(1.2 s), turning a little (TURN) as it goes; the brick lights up under it
(FLARE). The star has four long arms and four short ones between (ARM),
over a round core (CORE), each bright at the middle and fading to nothing,
and is drawn additively, square to the eye.
It is small on purpose: busy scenery pulls the eye off the hero, so the
star is kept just big enough to be seen. Its arms taper only a little in
shape and let the fading light make the point: an arm narrowing to nothing
went thinner than a pixel toward its tip and broke into dashes (the game has
no MSAA). The brick lights up within the depth test; the star is drawn over
whatever stands near it, as a glint is light in the eye, not a thing in the
scene. Where and when is plain state, unit-tested without a window;
Twinkles::draw is the only part that touches the GPU, and it draws from
the runner’s own random numbers (next_rand). A glint is drawn where its
brick rests, so twinkles keep to bricks the wind leaves still (Sway::moves,
below): on a swaying frond it would drift off its brick.
Wind in the jungle’s palms
The jungle’s six palms a tile are never quite still (game/src/sway.rs).
Their trunks sway slowly and unevenly, each palm on its own beat, bending
from the foot; their fronds rise and fall and flutter, each on its own, the
motion running along a frond as a ripple. Every few seconds a gust rolls
along the jungle from the right: it leans the palms over, blows the fronds
along and lifts them, the flutter triples, and the palms tremble a little
while it blows.
The jungle is still one mesh, drawn tile by tile as before; only its vertex
stage is new (assets/shaders/jungle_sway.vs, in front of Lam::pula’s
fragment stage, unchanged). What it may move rides in each vertex’s colour:
- Which bricks. While the jungle is painted, each cell remembers which
palm painted it last (
Jungle::palm_of), so a fern painted over a palm’s foot stays put, andPalmShapekeeps each palm’s foot, crown and beat. - How much.
props::Swaygives every corner of the brick lattice[bend, leaf, phase]:bend, how far it goes along with its palm’s trunk (nothing at the foot, the square of the height up to the crown, all of it on the fronds);leaf, how much it flutters and gives in a gust on top (nothing at the crown, the most at a frond’s tip,FROND_REACHbricks out);phase, the palm’s beat. Every vertex on a corner gets the same, so whatever the stage does, the bricks bend together and never open a crack; a plant touching a palm gives a little where it touches. - The moving.
jungle_sway.vsmoves each vertex by those weights, the trunk’s sway and lean along x, the fronds along x and y. Like the brick water, it hands Lam::pula the brick’s resting place asfragWorld, so a swaying brick keeps its own edges and corners instead of sliding against the lattice.
Its glass is WindyGlass: the far planes’ backdrop_glass() with this
vertex stage and WindParams (sent whenever they change). If it doesn’t compile, the
jungle stands still in the far planes’ glass. The knobs, in world units (a
jungle brick is 0.25): trunkSway, trunkGust and swaySpeed for the
trunks; leafSway, leafFlutter and flutterSpeed for the fronds in calm
air; leafGust, leafLift and gustFlutter for them in a gust; and
gustEvery, gustSpeed, gustSharp and buffet for the gusts themselves.
RONDELEK_WIND overrides any of them (see the tuning section below).
The meadow and the obstacles: bricks built in code
The ground and the obstacles aren’t drawings: they’re generated, in the same
brick style as the clouds and the water. game/src/bricks.rs is a small kit
for it. A Grid holds a palette colour per brick (0 = empty), and
BrickModel::build walls it in: one quad per brick face that borders an empty
cell (or a see-through brick, below), its texcoords pointing at its colour in
a small palette texture, one row for a solid grid (a PaletteMaterial,
shared with the brick water). That’s the shape of a
flat-draw export, so Lam::pula lights it the same way, finding the brick edges
and corners through BrickModel::lattice. raylib’s indices are 16-bit, so a
grid with more faces than one mesh holds (16383, four vertices each) builds
into several, drawn one after another (Faces::meshes). Build can leave out
the faces the camera never sees: the bottoms (open_below, for the ground)
and the backs (open_behind).
See-through bricks. A grid may also say how see-through each brick is
(Grid::set_alpha, 0 clear to SOLID; a solid grid carries no second
layer). The opacity is baked into the palette texture the way a flat-draw
export bakes a layer’s opacity into its atlas: one row per opacity the grid
uses (Grid::alphas), so Lam::pula draws it unchanged, through its tex.a.
Three things keep the glass right:
- Which faces. A solid brick covers its neighbour’s face; a see-through
one shows a solid neighbour’s face through it, but covers another
see-through one’s (
Grid::covers). Touching glass bricks are one body, seen by its skin, not a stack of panes: panes add up to solid again (and triple the faces). - Solid first, glass back to front.
Faces::newemits the solid faces first, front to back, so the depth test turns away what they hide before it is shaded; then the see-through ones sorted back to front (each slice’s fronts after its tops and sides; the camera is always in front), so each blends over what stands behind it. They build into separate meshes, andlay_tilesdraws every tile’s solid bricks (BrickModel::draw_solid) before any tile’s glass (draw_see_through). - Tile by tile. Seen at a slant, a tile’s back reaches past its seam, in
behind the front of its neighbour nearer the eye;
lay_tilesdraws the tile farthest to the side first (tiles_far_to_near), so it shows through that neighbour’s glass rather than being cut out by it.
Corner data for a vertex stage. BrickModel::build_with_corners takes a
function from a corner of the brick lattice to four bytes (Corners) and
hands them to the mesh as vertex colours, the same for every vertex on that
corner. Lam::pula’s own vertex stage ignores them; one of our own can move
the bricks by them without opening a crack (the jungle’s wind, above).
game/src/props.rs and game/src/obstacles.rs build the runner’s pieces
from a hash of each brick’s place, never a random generator, so they look the
same every game:
-
The meadow (
ground, 0.25-unit bricks, the water’s size): a flat grass top in three greens, flecked with tufts, buttercups and daisies off the hero’s lane, over layered earth with the odd stone, and grass hanging over the bank’s front edge. One tile is 32 units long. Its last column meets its first (Build::wrap_x), so the runner lays it tile after tile without a seam, and leaves out the bottoms and backs, which are never seen. The grass is flat on purpose: bricks standing up out of it read as toys left lying about and pulled the eye off the obstacles. -
The ledges (
ledge, meadow bricks): a floating strip of meadow, 12 or 16 bricks long and two thick, its earth row a brick short at each end, with grass hanging over the front. -
The obstacles (
obstacles.rs), from the jungle, in little bricks: a quarter of a meadow brick (OBSTACLE_CELL, 0.0625), fine enough for a log’s rings or a tortoise’s closed eye, which is what gives them their look. They are shaped in world units and laid in bricks bysculpt, so the brick size is one number. In natural colours:- jump, taking turns (
Look,low_turninrunner.rs): a mossy log lying across the path, its sawn end with rings and a crack toward the camera; and a sleeping yellow-footed tortoise, its head out toward the hero, eyes shut, its shell in hexagon plates laid out as the camera sees them (so their edges stay crisp from the front). The tortoise is longer and lower, with a hitbox of its own. - duck: a fallen trunk across the path, broken at one end and sawn at the other, a snapped branch and a bromeliad in bloom on its back. It rests on two heaps of mossy boulders that stand behind the hero’s lane (the hero is 0.35 deep), so the hero ducks under the trunk and runs past in front of the rocks. Anything standing in the lane would slide right through the hero as the obstacle went by.
- shoot: the red brick wall, its mortar sunk in so each brick catches
the light, in bricks of its own (
WALL_CELL, 0.125). - double jump: a clump of three golden bamboo canes, striped green, with nodes, flat leaf sprays (a round leaf a brick thick is lost from the front) and two shoots at their foot.
Tests hold each one to its hitbox in
runner.rs, the trunk to leaving room for a ducking hero, and the boulders to standing behind the lane. - jump, taking turns (
-
The vowel tablets (
tablet, 30 × 32 bricks and 4 thick): a relic from a jungle temple, in white limestone. A slab, its edges crisp and its front bevelled a brick; a frame of square notches and a groove round the face; the arcade’s bold pixel vowel (rondelek_core::arcade::vowel_glyph, the one on the entrance screens), two bricks a pixel, cut two bricks deep with bevelled walls and painted (TABLET_PAINT, deep). Each vowel’s stone is weathered its own way: a top corner knocked off right through, a hairline crack in from that side, moss creeping in at the bottom corner across and along the groove. Its bricks are fine (0.05 at full size) and the whole tablet is drawn atTABLET_SCALE(0.76) of the size it was designed at: every brick scales, so the design stays the same. White belongs to the stone: it must stand apart from the colourful world, so its shades are cool greys, never cream. Tests hold every letter to its carving inside the frame, and the paint to the letter.
They all share one Lam::pula, world_glass(): the clouds’ glass made solid,
under warm daylight lamps, and toned down. At the clouds’ full strength the
coloured bricks went pastel: the grass is seen nearly edge-on, where the
reflected room and the highlights are strongest, and the exposure curve
flattened what was left. So it has less exposure, a faint room, softer
highlights and more vibrance. The meadow’s lamps stand round a fixed stretch
of the world (ground_lamps), so it slides under still lamps; each obstacle
is lit by lamps round itself, so every one is lit alike.
The tablets have a glass of their own, stone_glass(): the same, made chalk.
Under the meadow’s warm lamps the white came out cream, and with the shading
and the reflected room it went silver, so it has white lamps, light all round
(a high ambient, a soft wrap), little sheen and almost no room. Lit that
brightly, a paint comes out lighter than it goes in, hence the deep paints.
The runner builds each move’s tablet once the grown-up has picked the vowels
(Tablets::build): one with the jump vowel, one with the duck vowel, one with
the shoot vowel. Over a low obstacle (log, tortoise, fallen tree) the tablet
floats a little behind the hero’s lane, so a jumping hero passes in front of
it, not through it, and bobs slow and small, each out of step. A tall one
(wall, bamboo) wears it on its front, over its upper part. A bumped obstacle carries
its tablet off. The tablets answer the voice: say a tablet’s vowel and it
hops (tablet_hop, one quick arc), and while the vowel is held its letter
lights up in the family colour at its most vivid (TABLET_LIT_PAINT, a second
build of the same grid). The stone stays white.
Tuning: tables, not constants
game/src/shader_params.rs borrows flat-draw’s way of doing things: a shader’s
knobs are one table (shader_params!), with one row per knob giving the
Rust field, flat-draw’s key, the default and the range. Everything else comes
from that row: the uniform name (vibrance → uVibrance), the per-frame
upload, and set(key, value) in flat-draw’s config format (floats, toggles as
0/1, colours as key.r/.g/.b).
Adding a knob is one row plus one uniform. Each shader has a test that reads
its GLSL and fails on a row without a uniform, or on a uniform nothing sets
(flat-draw’s TestEveryExposedParamHasItsUniform, checked both ways round).
LampulaParams’ defaults are flat-draw’s Def column.
None of this is exposed in the game’s UI. When you want to experiment, you have two options:
- edit a default in the table (or a preset such as
cloud_glass()) and rebuild; - or, without rebuilding, point an env var at a JSON file and restart the game:
RONDELEK_LAMPULA=<file.json>: flat-draw’s own~/.config/flatty/config.jsonworks as-is (itsshaderParams.lampulais used), so a look you tuned live in flat-draw’s Shaders pane carries straight over. So does asaved-ideas/lampula-*.jsonsnapshot, or a plain{ "exposure": 2.4, "lamp1On": 0, "ground": "#9FD4FF" }.RONDELEK_WATER=<file.json>tunes the water: keys ofBrickWaterParamsand of its glass (any Lam::pula key), e.g.{ "swellAmp": 0.1, "deep": "#1E5AC8", "lamp0": "#FFFFFF" }. The water ignoresRONDELEK_LAMPULA, so retuning the clouds’ glass leaves its lamps alone.RONDELEK_PROPS=<file.json>tunes the meadow’s and the obstacles’ glass (any Lam::pula key), e.g.{ "exposure": 1.4, "lamp0": "#FFFFFF" }. Like the water, it ignoresRONDELEK_LAMPULA.RONDELEK_WIND=<file.json>tunes the wind in the jungle’s palms (keys ofWindParams), e.g.{ "leafGust": 0.6, "gustEvery": 4, "buffet": 0 }.
Unknown keys and bad values are reported on stderr and skipped. A typo costs you one value, never the whole game.
Performance
The games draw every frame, so they are built to stay light on a family laptop’s integrated graphics. What a frame costs is fill (pixels shaded, mostly through Lam::pula), not vertices or draw calls (about fifty a frame). On a GTX 1650 Mobile at 2560×1440, Vowel Runner takes about 3.8 ms of GPU time a frame: about two-fifths of it the water’s glass, a quarter the far planes, the rest the meadow, the obstacles, the hero and the sun. At 60 fps the GPU idles along at about 1 GHz and 18 W, the game uses about a tenth of one CPU core (under a millisecond to build a frame), and the scene loads in under a tenth of a second. What keeps it there:
-
the water’s columns are only as deep as the eye needs (see the water);
-
everything behind the meadow is painted only above its far edge;
-
Lam::pula’s switches are compiled into each glass, and a shader’s tuning values are sent only when they change;
-
a far plane lays only the tiles in sight;
-
solid bricks are drawn front to back, so the depth test skips what they hide.
-
Frame pacing (
pace_framesingame/src/lib.rs): on a panel of about 60 Hz, vsync paces the frames, so the CPU waits in the swap instead of spinning through raylib’s frame timer, and nothing tears; the timer stays as a backstop a little above the panel’s rate. A faster panel keeps a plain 60 fps cap. While the window is minimized nothing is drawn and the game holds still. -
Measuring:
RONDELEK_GAME_STATS=1prints, on exit, the load time and frame-time percentiles split intoupdate,draw(building the frame on the CPU) andpresent(the flush, the swap and the cap’s wait). WithRONDELEK_GAME_FPS=0and vsync off (__GL_SYNC_TO_VBLANK=0on NVIDIA,vblank_mode=0on Mesa),presentis the GPU’s share:__GL_SYNC_TO_VBLANK=0 RONDELEK_GAME_FPS=0 RONDELEK_GAME_STATS=1 \ RONDELEK_GAME_AUTOPLAY=1 RONDELEK_GAME_SEED=7 RONDELEK_GAME_FRAMES=1500 \ target/release/rondelek-game runnerTo check a change keeps the look, record a few frames of the same seed before and after (
RONDELEK_GAME_RECORD, below) and compare them pixel by pixel. A virtual display (Xvfb) draws in software, so its timings mean nothing.
Testing and recording
cargo test -p rondelek-gamecovers the gameplay (jumps, ducks, shooting, the double jump’s reach, which moves earn a star, landing on ledges and jumping up through them, the little suns), the sun’s spring and reveal, the voice glow, the tuning tables and their shaders, the pixel-lattice recovery, and the brick props (faces turned outward, corners on the lattice, sizes against the hitboxes).- For headless runs,
RONDELEK_GAME_FRAMES=<n>skips the pre-game screens and quits after n frames,RONDELEK_GAME_SHOT=<png>saves a screenshot, andRONDELEK_GAME_SCREEN=profiles|selectshows those screens instead.RONDELEK_GAME_SEED=<n>deals the same course every run, so two builds’ frames can be compared pixel by pixel. - Demo mode:
RONDELEK_GAME_AUTOPLAY=1lets the game play itself (VoiceGame::autoplay; Vowel Runner’s isRunner::pilot), the way a child who knows every vowel would: it jumps blocks, ducks under bars, shoots walls, double-jumps the bamboo and hops up ledges for their suns, saying each vowel so the hero’s mouth moves and the water dances. Its triggers are lead times, so it keeps up as the game speeds up. A test lets it play four minutes without a single bump, which also proves every obstacle can be cleared at every speed the game reaches. - Recording:
RONDELEK_GAME_RECORD=<dir>saves every frame into the folder (00000.qoi, …: QOI, lossless and quick to write, where PNG took seconds a frame at 1080p), the game stepping a fixed 1/30 s each however slowly it draws. So a virtual display, which draws the game at a few frames a second, still makes smooth, real-speed 30 fps video.RONDELEK_GAME_RECORD_FROM=<s>plays the first s seconds unsaved. docs/images/arcade/record-runner.sh [start] [length] [still]records the README’s gameplay GIF and its still on a virtual display (Xvfb, demo mode, the recording mode above, ffmpeg): a 10 s take (SECS) at 1920×1080 (SIZE), from 4 s into the game (FROM), as the first obstacle comes in. Every game deals a fresh course, so the full take is kept (KEEP=<path>copies it out): look through it, then re-cut that same take withTAKE=<runner-take.mp4>instead of recording a different game.
Libraries
Here’s every third-party crate in the house, and why it’s here. Versions live in
Cargo.toml. Cargo.lock is committed too (this is an application, not a
library), so builds are reproducible.
GUI
| Crate | Role |
|---|---|
eframe | Application shell + windowing around egui. |
egui | Immediate-mode GUI toolkit — all widgets and the painter. |
winit | Low-level windowing under eframe; used directly only to force XWayland via --x11 on Linux (main.rs). |
egui_kittest (dev only) | Headless UI tests: renders the settings page, clicks controls by AccessKit label (settings_page::tests). Never linked into the app. |
Audio
| Crate | Role |
|---|---|
cpal | Cross-platform audio I/O: the input (capture) and output (playback) streams and their callbacks. |
hound | WAV encode/decode for recorded samples (audio/sample.rs). |
rustfft | FFT for the spectrum visualizer (ui/visualizer.rs). |
spectrograms | MFCC feature extraction for vowel detection (audio/vowel.rs); pure-Rust FFT backend. |
non-empty-slice | Non-empty slice/nzu! types required by the spectrograms API. |
Voice games (rondelek-game only)
| Crate | Role |
|---|---|
raylib | Window, 3D renderer and input for the voice mini-games. Confined to the game crate on purpose — see Architecture. |
serde_json | Reads the optional shader tuning files (RONDELEK_LAMPULA, RONDELEK_WATER). Already a dependency of core and app. |
The game art comes from our own flat-draw pixel editor, as .glb files. The
game embeds them and draws them itself, and two of its shaders (Lam::pula, plus
the model vertex shader it needs) are copied from flat-draw verbatim. The full
tour of models, shaders, tuning tables and the water is in
Voice games.
Camera & images
| Crate | Role |
|---|---|
nokhwa | Desktop webcam capture for avatars (input-native). |
image | Decode / resize / encode images — avatar processing and camera frames (jpeg, png, webp). |
rfd | Native file-open dialog for uploading an avatar. |
Persistence & utilities
| Crate | Role |
|---|---|
serde / serde_json | (De)serialize profile.json, session.json, settings.json. |
zip | Extract uploaded skin .zip archives into the skins folder (ui/skin.rs). |
dirs | Locate the OS data and config directories. |
uuid (v4) | Stable IDs for profiles and sessions. |
sys-locale | Detect the system language on first run. |
chrono (clock) | Local time for the dates grown-ups see (sessions, voice calibration), in ui/when.rs. Stored times stay UTC Unix seconds. |
anyhow | Ergonomic error handling (Result + Context) throughout. |
If you add, remove or repurpose a dependency, please update this page in the same change (see Contributing). Future you will be grateful.
Releases & packaging
Here’s how a version of Rondelek gets from a tag to something a family can
download. The short story: you push a v* tag, and
.github/workflows/release.yml does the rest.
| Job | Runner | Produces |
|---|---|---|
desktop | windows-latest | rondelek-<tag>-x86_64-pc-windows-msvc.zip (both .exes) |
linux | ubuntu-22.04 | rondelek-<tag>-x86_64.AppImage + .zsync, rondelek-<tag>-x86_64-unknown-linux-gnu.tar.gz |
publish | ubuntu-latest | attaches every build job’s files to the GitHub Release |
The build jobs only upload workflow artifacts. publish is the one job that
touches the release itself, so two jobs never race each other to create it. It
runs on !cancelled(), which means one platform failing doesn’t stop the
others from shipping. The macOS legs are commented out in the matrix for now.
Two binaries travel together
Every package holds both rondelek and rondelek-game, side by side, and they
need each other. The app starts a game by running the game binary from its own
folder (App::spawn_game, which uses std::env::current_exe()). If you’re
curious why the game is a separate process at all, Architecture
explains.
The Linux AppImage
Everything for the AppImage lives in packaging/appimage/, which also has its
own README. Here’s what you’ll find there:
AppRunruns the app by default, or the game on its own with--game(or when it’s invoked through a symlink namedrondelek-game).rondelek.desktopis the menu entry. ItsStartupWMClass=rondelekmatches the app’s window id (with_app_id("rondelek")inapp/src/main.rs).build.shassembles the AppDir from two release binaries and runs appimagetool (static type2 runtime, zstd, with update information for zsync-based updates).smoke.shruns the finished AppImage on a virtual display and checks that the app and the game each manage to render a frame.
The job runs on ubuntu-22.04 on purpose. A binary needs at least the glibc it was built against, and 2.35 covers Ubuntu 22.04+, Debian 12+ and current rolling distros. Nothing else is bundled besides the two binaries: X11/Wayland/GL come from the host at runtime.
The icon
assets/icon/rondelek.png (512×512) is generated by cargo run --bin genicon,
using the same pixel-art engine as the banner. Both binaries embed it as their
window icon, and the AppImage uses it as its icon too.
Contributing to these docs
Thanks for stopping by. This book is part of the codebase, not something tacked on afterwards, and it only stays useful if it keeps up with the code. So there’s one golden rule:
Any change to behaviour, wiring, data layout, or dependencies updates the relevant page in the same commit. Docs and code move together.
The same rule is written down in AGENTS.md,
so automated contributors follow it too.
Where things live
docs/
  book.toml           mdBook + mermaid configuration
  src/
    SUMMARY.md        the table of contents (add new pages here)
    *.md              one page per topic
    images/           screenshots and static assets
The pages are plain Markdown, so they also read fine on GitHub if you’re just
browsing docs/src/. Diagrams are Mermaid fenced
code blocks (```mermaid), rendered by mdbook-mermaid.
Build the site locally
The tooling is all Rust, so there’s nothing exotic to set up. Install it once:
cargo install mdbook mdbook-mermaid --locked
Then, from the repo root:
mdbook-mermaid install docs   # drops the mermaid JS assets into docs/ (git-ignored)
mdbook serve docs --open      # live-reloading preview at http://localhost:3000
# or a one-shot build into docs/book/
mdbook build docs
mdbook serve rebuilds as you type, so you can keep the preview open next to
your editor. docs/book/, docs/mermaid.min.js and docs/mermaid-init.js are
generated and git-ignored; please never commit them.
Publishing (GitHub Pages)
.github/workflows/docs.yml builds the book and deploys it to GitHub Pages
whenever a push to main / develop touches docs/** (you can also start it
by hand). It installs mdBook + mdbook-mermaid, runs mdbook-mermaid install,
then mdbook build, and uploads the result.
One-time repo setting: in Settings → Pages, the source is set to GitHub Actions. The book is live at https://pipejesus.github.io/rondelek-twst-1/.
Writing guidelines
- Draw a diagram when it makes the wiring clearer: data flow, state machines, threading. Prose is fine for everything else.
- Reference code by symbol name (
Playback::drain_monitor), not by line number. Names survive refactors; line numbers go stale the moment someone adds a blank line. - Keep each page about one topic, and add new pages to
SUMMARY.md. - Keep Mermaid labels free of parentheses and angle brackets (use
<br/>for line breaks) so they render reliably. - Write like you’re showing a friend around: plain words, short sentences, and “you” is welcome.
- The Playing with Rondelek pages are for parents. Keep them free of code and jargon, and describe what they’ll see on screen, using the app’s own words for buttons (Voice calibration, For grown-ups…).